Note Taker HD Help Pages
This is a web page with the contents of the main Help system
that comes with Note Taker HD for the
Apple iPad, version 6.8.
- Introduction: Introduction and Legal Notices
- Overview of Note Taker HD: What is Note Taker HD and how is it organized?
- Writing on the Screen: An overview of how your finger writing is shrunk for the page
- Page Editing: Description of each of the buttons shown when editing pages
- Text on the Page: Explanation of inserting and editing blocks of text on a page
- Shapes on the Page: Explanation of inserting and editing shapes on a page
- Images and Photos on the Page: Explanation of inserting and sizing images on a page
- Selecting Ink and Other Objects: How to move and do other operations on ink and other objects
- Multi-Page Docs: Docs that consist of more than one page
- Folders: About Folders of Docs and Folders of Folders
- Page and Doc Settings: Doc name, thumbnail cropping, and more
- Editing Tools: The tools that the Tools buttons make available while editing
- The Managing Window: Organizing and creating folders and docs
- Managing Window Tools: Deleting docs, editing tags, outputting as PDF, and more
- App Settings: Default values, button color, automatic return, and more
- Output Settings: Settings for PDF emailing and other output
- Optional Fields: Fields that may be included in various App and Output Settings
- PDF Annotation Docs: Importing PDF files and writing on them
- Background Image List: Custom backgrounds using images or PDF pages
- Backup and Restore: Saving data for backup and sharing
- File Sharing: Note Taker HD Documents in Apple iTunes File Sharing
- VGA / Digital AV / AirPlay Echoing: Echoing to an external display using the VGA or Digital AV Adapters, or AirPlay
- Password and File Protection: Various means to keep data private
- Retina Display: About the high-resolution screen on the 3rd-generation iPad
- What's New in Version 6.8: Changes in Note Taker HD 6.8 and before
- Differences from iPhone/iPod touch Note Taker 2.0: An overview for users of the other app
- YouTube Videos: A button to bring up the Note Taker HD instructional videos
- Other Information: About the author, etc.
- Special Offers on a "Pen" and Related Products: Discount codes for two brands of stylus for "writing" on the screen and more
v 6.8
This is Help for using Dan Bricklin's® Note Taker HD, a Software Garden® Product.
There is a Help Table of Contents that you can view by pressing the "Contents" button above.
The contents button lets you navigate directly to a particular Help page. When done, you can press the "Done" button in the upper-left above to return to the list of your Note Taker HD folders, docs, and pages.
You can also switch between Help pages by pressing the ">" (next) and "<" (previous) buttons in the navigation bar at the top of each page.
Instructional Videos
Go to www.youtube.com/NoteTakerHD to see all Note Taker HD videos.
The YouTube Videos page of this Help has a button that will bring
these up in the browser on this device.
Support Web Site
The button below will switch to the support web site, www.notetakerhd.com,
which, in addition to links to the videos and a list of
frequently asked questions, has a copy of this entire Help as a single web page
as well as free templates and clip art for download.
Screen-specific Help
Many screens have a "?" button in the toolbar at the top. Pressing that
will pop up help about the operation of that specific screen.
LEGAL NOTICES
This app is:
© Copyright 2009-2012 Software Garden, Inc.
All Rights Reserved.
www.softwaregarden.com
Dan Bricklin's is a registered trademark of Daniel S. Bricklin.
Software Garden is a registered trademark of Software Garden, Inc.
The internal shape definitions copied from this app into the data files are only for use with Software Garden, Inc., products. The visual output, how you arrange and set them on the page, and PDF files they produce are yours.
OVERVIEW OF NOTE TAKER HD
You can use Note Taker HD to take notes, sketch diagrams, annotate PDF files, type blocks of text,
and more, and then organize those note pages for quick and easy access later. You can also email one or more pages
as a single PDF file or open that PDF file in other apps.
Pages
Note Taker HD lets you create pages by writing on the screen with your finger or a compatible stylus.
You can either write directly on the page for large drawings, or have
the "ink" you write shrunk down so you can write with large letters more suited to
directly writing with your finger.
You can read the reduced-size ink as if you had written those letters with
a very fine pen.
You can also type in blocks of text on those pages using the iPad keyboard, as well as insert shapes and images.
There are some simple "tricks" to creating Note Taker HD pages that you need to learn in order to make best use of those pages. Make sure you either read this Help carefully, watch the YouTube videos, or spend time trying out each of the buttons and reading the "?" help on many pages.
Docs and Folders
The pages are organized into documents (called "docs" throughout the app), each with one or
more pages. The docs can be organized into folders.
The Managing Window: List of Folders, Docs, and Pages
You can have many docs.
They can be accessed at a later point through a powerful listing display
that can organize them in many useful ways.
In the doc listing, each doc is represented by a thumbnail image of part of the first page, along
with an optional name that you type in.
In the page listing, each page is represented by a thumbnail image of part of that page,
along with the page number.
This presentation where you are managing these lists of folders, docs, and pages is called the "Managing Window."
When you tap on a thumbnail, a preview of the page is displayed on the right side of the screen. This preview may be resized by using the pinch gesture. You can move around by dragging with your finger. Tap the page name above the preview to edit the name.
Swiping right or left on the preview (touching and dragging before releasing) switches from doc to doc. Swiping up or down switches from page to page within the doc. There are also buttons below the preview to switch (and to show you the direction to swipe).
Creating New Docs

You create a new doc by pressing the "+" button in the toolbar above the list of docs. You can either create a plain, default "blank" doc, create a doc based on a previously imported PDF file, or choose to start with a copy of any doc in the "Templates" folder.
Organizing the Docs
The docs can be displayed with the most recently edited listed first (the default), alphabetically by name,
by date/time created,
or by "doc number." The docs' numbers start in the order you create them, like a notebook,
but you can reorder them manually, like a looseleaf notebook.
You can designate any doc as a "favorite" so that you can easily find it in a shorter list even if it has been a long time since you last edited the doc. These favorites are like the docs you want close at hand at the moment, like notes you stick around your desktop computer screen. You can also designate a doc as one to become a favorite at a later time to defer highlighting it until sometime in the future.
You can filter the docs listed to only show those docs that are favorites, that you have assigned particular text "tags" or colored flags, or that have certain text in the title.
When viewing the list of docs, and you have selected a doc for preview, a ">" is shown to the right of the thumbnail. Pressing the ">" will display the list of page thumbnails for that doc. Alternatively, if you press and hold for more than 1/2 second on the thumbnail image of the first page in the list of docs, it will show with a special highlight. When you release, a list of pages for that doc will be shown.
Full-Screen

Full Screen

Exit Full
When viewing the list of docs or pages you can push the "Full Screen" button to preview the page full-screen. Tapping the screen once when viewing full-screen brings up buttons to return to regular preview and listing. Swiping left, right, up, and down works when viewing full-screen.
Folders
Docs are kept in "folders."
Each doc may only be in one folder, though you can easily move or copy docs from folder to folder.
The listing of docs only shows the contents of one folder at a time.
You can display the contents of a folder by either tapping the ">" to the right of the name, or by double-tapping on the name:
Folders may contain either docs or other folders (but not both). When you create a new folder by using the "+" button above the list, you will be given the option of either creating a "Folder of Docs" or a "Folder of Folders."
If you are viewing the contents of a "Folder of Folders" you can change to view the contents of the containing folder by pressing the "Up" button:

Up
Tools
When displaying the Managing Window viewing the lists of folders, docs, or pages you will find tools available
in the bottom-right corner of the screen.
These include tools for deleting pages, reordering docs,
setting and editing tags, backup and restore, and more.
Editing

Open
When viewing the list of docs or pages, use the Open button at the top to bring up a different window for editing the doc where you last left off. You can also bring up editing directly on a page by double-tapping on the thumbnail or preview.
When editing, a completely different view is shown, with different tools at the top and one or two large windows below for viewing the page being edited.
Editing has two different modes: Zoomed and unzoomed. There is a "magnifier" button on the toolbar to switch between them. When unzoomed, you will see just a single window with the page. "Writing" with your finger or a compatible stylus will put "ink" (lines) on the page. Pinching with two fingers lets you change the magnification of the window to show more or less of the page.
When doing zoom editing the top window shows all or a portion of the page (use pinch or drag to change which portion). The bottom window shows a close-up view of a small part of the page. You write in the bottom window and the ink will also echo into the top window, but reduced in size.
Editing is explained in greater detail in the next help topic.
Multi-Page Docs
You usually need to write more at one time than fits on the single page of "paper" that makes up each page.
In that case, you can add additional pages to a doc, one right after the other, by pressing a "+" button while editing.
A multi-page doc may be emailed, printed, or "Opened In" as a multi-page PDF file. A multi-page doc appears
in the List of Docs as the thumbnail of the first page with an indication of the total number of pages on the thumbnail.
Individual docs that logically go together may be grouped together later as a single doc made up of many pages by "stapling" the extra docs to a first doc. That combined doc may then be organized by tags, favorites, etc., like any other doc.
A PDF file that has been brought in as an Annotation Doc appears as a multi-page doc with each page having a different page of the original PDF file as a background on which to write.
See the Multi-Page Docs help topic for more information.
Help Pages
These Help topics includes ones that explain the functionality of editing pages,
pages explaining each of the Settings pages where you access attributes (such as assigning
a tag to a page), and pages explaining the various palettes of tools that can be
applied to individual pages as well as those that apply to groups of pages.
Finally, there are Help topics to access the Note Taker HD YouTube video channel
and some miscellaneous information about Note Taker HD.

Many screens have a "?" button in the toolbar at the top. Pressing that will pop up basic help about the operation of that specific screen. Read this Main Help for more detailed explanations.
WRITING ON THE SCREEN
Writing on the screen with your finger or an iPad-compatible stylus is one of the key aspects of Note Taker HD.
Being familiar with how it works is crucial for getting the most out of the app.
This page goes over the general concept of "write big, read small" that underlies ink pages. The next page goes over some of the specifics of the various buttons.
Note Taker HD shrinks your writing
When you first create a page, you are brought to an editing screen where you can write directly
on an image of the page. This is the "Unzoomed" mode for "one window" editing.
Just draw with your finger and "ink" will appear wherever you touch the screen.
The word "unzoomed" refers to the fact that what you write goes directly on the
page as you wrote it without change in magnification.
Writing with a finger does not give you the fine control that you are used to with something like a pencil. You normally only have room for just a handful of words written with your finger unless you have small fingers and a lot of patience. Note Taker HD, though, makes it easy to create small, readable text by automatically shrinking your writing so that you can comfortably write with larger letters yet end up with normally-sized ones.
Unzoomed Editing
When drawing directly on the Page View with unzoomed editing, you can use the two-finger
pinch gesture to change the magnification of what you see on the page.
This lets you write in large letters, but have them display smaller when the page is displayed in its
entirety.
With unzoomed editing, where you draw directly on the Page View, you can't move around on a zoomed-in page by dragging. That would just draw lines. Instead, you can move by dragging while pinching, or pinch out and then pinch back in on the new location.
Also, tapping or double-tapping cannot be used in an unzoomed window to change magnification like they are in some other apps because you naturally use tapping for dotting the letter "i" and other normal writing purposes. Instead, you can use the "Fit" toggle button above the Page View to change the magnification of the Page View to fit the entire page width or height itself:

Fit

Fit
The pinch gesture also has a "click-stop" at the size "Size to Width" and "Size to Height." If needed, just pinch again to continue changing magnification.
If you are writing small text on the unzoomed Page View you may find that you rest your wrist on the screen and inadvertently leave marks or start zooming. To help get around this, there is an optional "wrist guard" described below.
Zoomed Editing -- Adding the Close-Up View
Unzoomed editing works quite well for drawing diagrams and writing down just a few words.
However, when writing whole sentences or paragraphs,
repeatedly pinching in to write large letters and then pinching out to see how they look,
or two-finger dragging to move every few letters,
can be very tedious.
To make continuous writing feel more comfortable, and go more quickly, you can switch to the Zoomed editing
by pressing the Zoom button:

Zoom
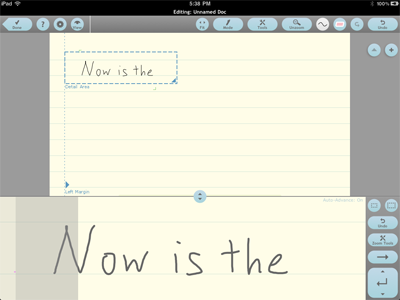
Zoomed editing includes both the Page View at the top and the Close-Up View at the bottom of the screen. The Close-Up View displays a writeable, magnified image of a small section of the Page View. The Page View has a small rectangle, outlined with a dashed blue line, that corresponds to the contents of the Close-Up View.
That blue-outlined rectangle is called the Detail Area.
When you write on the Close-Up View at the bottom, the large letters that appear there will be echoed at a much smaller size in the Detail Area on the Page View.
Once you've filled the Close-Up View with ink and need more space to write more, you can move the Detail Area by dragging it on the Page View or by tapping where you want it to move.
There is also an Advance button that lets you move over just enough to continue your new writing right next to the old with a single tap:

You can move backward by dragging from the Advance button to the left.
There is an Automatic Advance mode that lets you move to the right without pressing any buttons at all. You just continue your writing on the left side of the Close-Up View and it will move over automatically before showing your new ink. You press the "Zoom Tools" button and then select "Turn Auto-Advance ON/OFF" to toggle between on and off:

Zoom Tools

Turn Auto-Advance ON

Turn Auto-Advance OFF
Details about Auto-Advance are in the "Auto-Advance" part of the next help topic. Other buttons on the editing windows are described in the next help topic, too.
The Unzoomed Wrist Guard
If you are writing small text on the unzoomed Page View you may find that you
rest your wrist or palm on the screen and inadvertently leave marks or start zooming.
To help avoid this problem, you can turn on the unzoomed "wrist guard" by pressing the Tools button
and then choosing the Wrist Guard ON tool:
Tools

Wrist Guard ON
You hide the wrist guard by using the Wrist Guard OFF tool that replaces the Wrist Guard ON tool.
The wrist guard is mainly transparent with a light dotted green line at its top and a green diamond in the upper-left corner:
The wrist guard protects the area below it from touches. Resting your wrist or finger on the wrist guard area does not register as writing or pinching. You can, though, continue a line of ink that you start above the wrist guard down into the wrist guard area.
The wrist guard moves automatically as you write, staying a fixed distance below the bottom of your writing after each stroke.
You can also drag the diamond to move the wrist guard up and down manually.
There are application-wide unzoomed wrist guard settings in the main App Settings. You can set the automatic separation distance between the wrist guard and your writing as well as where it assumes your wrist is relative to your fingers.
Zoomed Wrist Guard
When writing in Zoomed mode some people find that they want the Close-Up View to
be higher up on the screen so they can rest their wrist on the screen instead of
the iPad bezel or the desk.
You can do this by turning on the Zoom Wrist Guard using a Zoom Tool:
Zoom Tools

Zoom Wrist Guard ON
When the Zoom wrist guard is on, the Close-Up View is kept at a constant, small vertical size when the Separator Handle is dragged upwards instead of growing in size. This provides space below on which to rest your wrist.
Unlike the unzoomed wrist guard, which is remembered on a per-page basis, the zoom wrist guard setting is app-wide.
Wrist Guards and Multitasking Gestures
The four- and five-finger "multitasking gestures" introduced in iOS 5 can sometimes interfere with
the wrist guard when the system interprets your palm as some extra fingers.
You will see the screen wiggle or even start switching to another app.
The multitasking gesture functionality may be turned off in the iPad Settings' "General" section.
Support for left-handed and right-handed operation
By default, the app is set up for people who write with their wrist below the fingers they write with (or
hold a stylus with).
Buttons are generally in the far right or upper part of the screen to avoid accidental touches by your
palm. The Close-Up View is at the bottom of the screen for similar reasons.
The wrist guard blocks touches below your writing when unzoomed.
This works for most right-handed and many left-handed people.
However, many other people, especially many left-handed people, write with their wrist above their fingers. The default layout and wrist guard operation do not work as well for them, and inadvertent touches become common. To help avoid this situation, there is a "Wrist Writing Position" setting in the App Settings (on the Managing Window) for indicating the assumed wrist position.
For those people who write with their wrists above their fingers, you can set the Writing Wrist Position setting to "Above writing" and then the layout and operation when editing will act differently than the default "Below writing." Buttons will display at the lower part of the screen, the wrist guards will block touches above your writing instead of below, and the Close-Up View will be at the top of the screen when doing zoomed editing instead of the bottom. The top line of the screen, with the time and power information, is also hidden to minimize the effect of dragging from the top with your wrist (which shows Notifications introduced in iOS 5).
For those people who write with their wrists to the left of their fingers, the wrist guards are less helpful. In that case, a physical guard, like the one described in the Special Offers section of Help at the end, may be the best solution.
Speed of operations
This app has been optimized for use with handwritten notes with a very fine line.
When you use a large amount of ink on a page that is thicker than the thinnest line
setting, some operations, like changing pinching or panning the display, behave in
what may appear to be an unexpected manner for performance purposes.
To make operation smoother, all ink is displayed as thin "single pixel" ink when pinching or panning, as well as some other operations. As soon as you remove your finger from the screen, the original, thicker ink of lines written with a thicker ink setting will reappear, though that may take a second or more each time you pick up your finger when there is a large amount of thick ink in view, or a complex PDF background.
During pinching and panning most line smoothing is also turned off.
There are a few App Settings that you can use to affect the speed of operation. For example, the timing of echoing of ink in Zoom Mode in the other window and updating the External Video display may be modified. On a retina display-iPad you can adjust various quality settings that affect page display performance. See the App Settings and the Retina Display help pages for more information.
PAGE EDITING
This page goes over some of the specifics
of the various buttons on the editing windows.
Here is what the zoomed editing typically looks like:
The top area displays the Page View. You can change magnification with pinch. When doing zoomed editing, if there are parts of the page that are not showing because of magnification, you can move the page behind the viewport by dragging on the page. When doing unzoomed editing you can move it while using two fingers like pinch.
The Detail Area is outlined with a dashed blue line in the Page View. You can move it by dragging within the Detail Area, or by tapping elsewhere on the Page View. You can resize the Detail Area by dragging the triangle handle in its lower-right corner. The size of the Detail Area determines how much the ink you write in the Close-Up View is shrunk. The smaller the Detail Area the more the ink is shrunk.
The vertical dashed blue line is the Left Margin. The Detail Area is moved down a line and then aligned with the Left Margin when you press the Return button. You can reposition the Left Margin by dragging the triangle handle near the bottom. When Auto-Return in enabled you will also see a dashed blue Right Margin that indicates where the Auto-Return takes effect.
The barely visible greenish bar in the center of the bottom of the Page View indicates that there is more of the page in that direction. This indication is shown for each of the edges in the Page View (as well as in the preview on the Managing Window).
The light-green crop-marks (which you may be able to see in the screenshot above the "N" and below the "e") indicate the extents of the thumbnail that will appear in the lists of docs and pages. By default the cropping extents are determined automatically. You can set custom extents manually for a given page by using the Thumbnail page setting or a tool in the Managing Window.
The bottom area is the Close-Up View. You can write on it with your finger or compatible stylus. Ink shows up as a thicker dark gray line, and is echoed into the corresponding part of the Detail Area above it. When the Detail Area is repositioned, the Close-Up View changes to show a magnified image of the new location on the page. You can resize the Detail Area and change the magnification by using the pinch gesture in the Close-Up View.
THE BUTTONS
Here is a list of each of the buttons and a description of what they do:
Done

Done
Pressing this button saves your editing and returns to the Managing Window.
Local Help
The Local Help button pops up a short list of help about the current editing window. Scroll through it to read. Tap outside it to dismiss.
Page Settings

The Page Settings button flips to the Page Settings screen. This screen lets you set the type of page background (such as Narrow Lined or Wide Grid), set the page's name, and much more. It has its own help page.
View / Edit

View
Edit
The View button brings you to a window with just the Page View and no editing. It lets you see a large view of all of the page and makes it harder to inadvertently add spurious ink. It also includes an optional list of pages if the doc has more than one page.
The Edit button returns to editing as does double-tapping on the Page View. If the list of pages is displayed for a multi-page doc, double-tapping a page's thumbnail will also switch back to editing.
When viewing you can use "swipe" (touch and dragging) to move between pages in a multi-page doc. Swiping from bottom to top or right to left switches to the next page while swiping from top to bottom or left to right switches to the previous page.
Doc Name
The middle of the bar at the top of the screen indicates whether you are editing or viewing and displays the doc name. Tap on the name to edit. See the Page Settings help page for more information about the name.
Fit Page Area
Fit
Fit
This button changes magnification of the Page View to display the page using the specified criteria. Fit to Height (with the vertical arrows) fits the page vertically, while Fit to Width (with the horizontal arrows) shows all of the width and is often the most readable way to view the page. The button toggles between the two operations, with Fit to Height only showing when the magnification is already Fit to Width.
Mode: Ink, Text, Shape, Image, and Select

Mode
This button brings up a list to switch between various editing modes:
Ink

Type Text

Shapes

Images

Select
The next three items in the list let you insert and edit blocks of text, shapes, and images, respectively. The last button lets you select and manipulate ink and those other objects. These other editing modes are described in their own Help topics following this one.
Tools
Tools
This button brings up the Editing Tools. The Editing Tools have their own help page.
Unzoomed and Zoom Editing

Unzoom
Zoom
This button, a toggle, switches between the two types of editing.
Pen Color and Thickness Attributes

Tapping this button brings up a list of colors and line thicknesses. Choosing a color sets the color of new ink and changes the color of the lines on the button. Choosing a line thickness changes the thickness of new ink and dismisses the chooser.
There are four "highlighter" colors that are semi-transparent. Choosing one of these automatically sets the line thickness to very thick and dismisses the chooser.
The top row of the chooser has four pen color/thickness presets. You can customize these using the "Set Pen Presets" Zoom Tool or the "Pen Presets" App Setting.
Pressing, holding for 3/4 second or more, and then releasing the Pen Color and Thickness Attribute button will bring up the same customization screen.
There is a Pen Memory app setting that lets you specify whether the pen color and thickness are remembered on a per-page basis (so when you go back to a page you can write using the same pen as when you last edited it), on a per-doc basis (so that as you go from page to page in a doc the pen color and thickness are "sticky" and don't change as you switch, but when you edit different docs they will each have their own "last pen used"), or on an app-wide basis (where the pen is always as you last used it, even when switching pages or docs).
NOTE: This app has been optimized for use with handwritten notes with a very fine line. To make operation smoother, all ink is displayed as thin "single pixel" ink when pinching or panning, as well as some other operations. As soon as you remove your finger from the screen, the original, thicker ink of lines written with a thicker ink setting will reappear, though that may take a second or more each time you pick up your finger when there is a large amount of thick ink in view.
Erase

This hides some of the other buttons and then lets you use your finger to erase ink. As you drag your finger over the page, ink you touch is erased. When you take your finger off of the screen, the eraser is turned off and you are back to normal writing. Erasing may be undone with the Undo button.
You may erase in either the Page View or the Close-Up View.
You can cancel erase after pressing the button if you decide you don't want to erase by pressing the button a second time.
The Erase button only erases ink. You can erase text, shapes, and images using their edit modes. The Select editing mode can erase all four forms of content.
When you press the Erase button, the Erase All button appears next to it to let you erase all of the ink on the page at once:

Erase All
Erase All requires your confirmation since it cannot be undone. It erases ink as well as text, shapes, and images.
Undo and Redo


Undo
Each time you press the Undo button one step is undone. A step can consist of one stroke of ink (finger down, moving, finger up) or one stroke of erasing (but not Erase All). A stroke is a continuous line of any shape.
When steps are undone, the Redo button will display in an active state. (The screenshot shows it in the inactive state with nothing to redo.) You can press the Redo button to redo steps that have been undone.
As with word processors and other computer applications, some operations, such as switching to another page or app, or returning to the Managing Window, will empty the list of steps that may be undone. New ink or other editing can empty the redo list, too.
In zoomed editing there is an extra Undo button to the right of the Close-Up View to make it easier to use while writing.
Add Page, Previous Page, and Next Page


The "+" (Add Page) button creates a new, blank page after the current page. The new page will start with the same background, etc., as the current page. All of the pages are part the same doc. This operation requires confirmation since it is easy to press the button inadvertently.
Only the thumbnail of the first page is listed in the list of docs in the Managing Window. You create new docs using the "+" (Add New Doc) button when viewing the list of docs, not by using the "+" (Add Sheet) button here.
See the Multi-Page Docs help topic for more information about multiple pages.
(Note that blank pages added to Annotation Docs will be normal pages without the PDF file as a background. They are like plain sheets of paper inserted after the original "printed" pages.)
The Next Page and Previous Page buttons switch editing (and viewing) to the appropriate page. If there are no pages following the current page for the current doc, the Next Page button is replaced with the "+" (Add Page) button.
List


When Viewing a page, you can see thumbnails of all of the pages by pressing the List button. Hide the list by tapping it again. Tap on a thumbnail in the list to switch to that page. Double-tap to switch to editing it.
The list of pages when viewing lets you reorder the pages or delete them by pressing the Edit List button:

When you finish editing the list, press the button again to return to normal viewing.
First Page, Last Page


When the list of pages is shown while viewing, you can quickly switch to the first or last page using these buttons.
Zoom Editing Separator Handle

Dragging this handle up or down changes the sizes of the two views in zoom editing. The setting is remembered for the page, and there is a separate one for portrait/vertical orientation and landscape/horizontal orientation.
This is useful, for example, when you need a higher Close-Up View for filling in charts.
If the Zoom Wrist Guard is on, only the top view changes size and the position is remembered app-wide.
Detail Area Size


These buttons set the Detail Area to a preset size: "Small" and "Large." The smaller one is useful for writing that ends up small on a narrow-lined background, or when you like to write with large characters with your finger. The larger one is useful for producing smaller writing or with the wide-lined background. The Large size may be customized through the "Preset Detail Area Size Button" App Setting.
Zoom Editing Configurable Buttons


Auto
RTL
Using the "Zoom Editing Configurable Button" App Settings, you can replace the Detail Area Size buttons with a variety of other buttons, including these: a second eraser, an Advance left button, pen attributes chooser, Auto-Advance toggle, redo, and Toggle Right-to-Left Auto-Advance. The Detail Area size may still be changed with a Zoom Tool.
Zoom Tools
Zoom Tools
The Zoom Tools button lets you access these tools near the Close-Up View during zoom editing:
Turn Auto-Advance ON
Turn Auto-Advance OFF
Zoom Small
Zoom Large
Pen Pen Presets
Pen Attributes
Erase
Advance Left

Set Return Spacing

Set Writing Direction to RTL

Set Writing Direction to LTR
Zoom Wrist Guard ON
Zoom Wrist Guard OFF
You can use the "Zoom Editing Configurable Button" App Settings to assign some of these to the two buttons above.
"Turn Auto-Advance ON/OFF" and "Set Writing Direction to RTL/LTR" are each explained below.
Advance
Pressing the Advance button moves the Detail Area to the right. If you have just written on the Close-Up View, the Detail Area is moved enough to overlap the end of the right-most side of that ink slightly. This lets you continue your writing by starting anew on the left side of the Close-Up View. If you have recently moved the Detail Area and not added new ink, the Advance button just moves by about half the width of the Detail Area.
When you advance all the way to near the right edge of the page, the background in the Close-Up View will display brown dots to indicate that you are approaching a page edge. (The bottom edge of the page gives a similar effect.)
When you get near the right extent of the page you can press the Return button to move the Detail Area to the next line at the left margin.
If you touch the Advance button and then drag your finger to the left, the Detail Area will move to the left, up, and down in concert with your finger. This lets you "back up" or make minor adjustments in position without needing to touch the Page View.
Auto-Advance
Turn Auto-Advance ON
Turn Auto-Advance OFF
These Zoom tools toggle Auto-Advance between off and on. They are also available as a single Zoom Editing Configurable Button which shows the current state and toggles when tapped:

Auto
Auto
The current state of Auto-Advance is always displayed in the upper-right corner of the Close-Up View, showing either "Auto-Advance: Off" or "Auto-Advance: On".
When Auto-Advance is on, when you write to the right of just about the middle of the Close-Up View the gray Auto-Advance Area will be shown on the Close-Up View. You can see it in the screenshot above.
When the Auto-Advance Area is shown, writing on it will first automatically "press" the Advance button before starting to show your new ink. This makes the new ink appear just to the right of the old ink.
This behavior lets you write continuously without pausing to press any buttons. All you have to do is pick up your finger when you get close to the right side of the Close-Up View and continue writing from the left in the gray area. It will all be strung together nicely to make words and sentences. Use the Return button to go to the next line. There is also optional Auto-Return, described below.
There is additional logic to handle cases when you want writing in the Auto-Advance Area to be added to what is already there instead of moving to the right. Here's how it works: If you have a single stroke of writing that extends from within the Auto-Advance Area towards the right a sufficient amount, the Auto-Advance Area behaves slightly differently. It examines what you write to determine the likelihood that you are doing something like dotting an "i" or crossing a "t." The new stroke will be shown in purple until you take your finger off of the screen. If the stroke is small and not near the bottom of the stroke it is over, or very short in height, it will be left overlapping what was already there. If it is tall, low, or very wide, it will be treated like normal auto-advancing. These simple rules handle many common situations, including diacritical marks such as accent acute and grave, umlaut, etc. For other situations just turn Auto-Advance off temporarily.
You can turn off the Auto-Advance gray area for one stroke by tapping within the Detail Area on the Page View.
Writing done exactly at the left side of the darker gray area will end up being lined up right after the ink that you wrote. Starting your new writing nearer to the right side of the gray area will leave extra space, such as to begin a new word. Starting your writing to the left of the beginning of the dark gray area lets you overlap previous ink a bit.
There are situations, such as when writing a long word in cursive handwriting, when you want to know exactly where to continue the new ink to make it continuous with the stroke you've already written. To help you do that, the location to continue the end of the right-most stroke is indicated in the Auto-Advance Area by a small white triangle.
There is an App Setting to toggle between the default Auto-Advance behavior of advancing immediately when you start writing in the Auto-Advance Area and an alternative behavior of advancing when you finish writing the first stroke. In both cases the dotting "i" testing is performed.
For writing in a language that goes from right-to-left, such as Arabic and Hebrew, you can switch to "Right-to-Left Auto-Advance", which is described below.
Return

Tapping this button moves the Detail Area to the the next line at the left margin. The Detail Area is aligned on a line boundary to facilitate even writing. (With the narrow grid background it moves two lines at a time.)
To write in columns, you can position the Left Margin by dragging its handle at the bottom and then use the Return button when writing text down the column. You can then reposition the Left Margin where you want the next column to be and start writing text at the top, moving down that second column by pressing the Return button.
Dragging up or down starting on this button moves the Detail Area up or down in line increments on line boundaries. This makes it easier to align the Detail Area onto a line boundary after you position it where you want to start writing by tapping on the Page View or by dragging on the Advance button.
There is a Zoom tool to set the distance between lines used for Return. See Line Spacing for Return, below.
Auto-Return
When the Auto-Return App Setting is "On" (the default), there is an
automatic alternative to pressing the Return button.
If you have recently written any ink in the right margin area (shown with
a brown-dot background) then writing in the Auto-Advance Area will first
advance the Detail Area vertically by the Line Spacing used by the Return button
and move it to the Left Margin.
(Unlike the Return button, there will be no additional vertical adjustments to align on line boundaries.)
Writing done exactly at the left side of the darker gray area will end up being lined up right at the Left Margin line.
When Auto-Return is turned on, the Right Margin is displayed on the Page View in a manner similar to the Left Margin. By default, the Right Margin is set at 90% of the width of the page. By dragging on the triangle at the bottom of the dashed line, you can set a custom right margin for the page.
Line Spacing for Return
Each of the different backgrounds (wide lined, narrow lined, the grids, etc.) and
PDF annotation pages have a default
line spacing value and offset that are used to determine where to move when the Return
button is pressed.
This can be changed for any given page.
There is a Line Spacing for Return Page setting. There is also a Set Return Spacing tool. Both switch to a window for setting the Line Spacing:
Zoom Tools
Set Return Spacing
The Line Spacing window will show horizontal lines representing the line spacing, with an offset at the top that affects the exact placement of the line boundaries on the page. A grayed-out image of the current page will be displayed behind the lines as a guide. This is especially useful when adjusting the spacing on a PDF annotation page.
A key is displayed that indicates the current values of the Line Spacing and the Top Offset. The values are in special units used by the app and are shown so you can exactly recreate the behavior of one page on another. You can change the value of the line spacing by using the pinch gesture with two fingers. You can change the offset by dragging with one finger up or down. In both cases, slow finger movement will adjust the value by smaller increments than fast movement. Confirm the new values by pressing the Done button, or Cancel to leave them as they were.
There is an App Setting for changing the Default Annotation Doc Line Spacing. PDF Annotation pages will use that value by default unless explicitly overridden for a given page.
Whenever the type of background is changed for a page, the Line Spacing values are reset to the default for that type of background.
When a new page is added to a doc (such as by pressing "+" when viewing the last page or using the Insert Page tool) the new page will initially start with the same Line Spacing values as the current page. This means you can change what it would be for a new blank doc by using a blank Template Doc that has the desired values.
The Unzoomed Wrist Guard
If you are writing small text on the unzoomed Page View you may find that you
rest your wrist or palm on the screen and inadvertently leave marks or start zooming.
To help avoid this problem, you can turn on the unzoomed "wrist guard" by pressing the Tools button
and then choosing the Wrist Guard ON tool:
Tools
Wrist Guard ON
You hide the wrist guard by using the Wrist Guard OFF tool that replaces the Wrist Guard ON tool.
The wrist guard is mainly transparent with a light dotted green line at its top and a green diamond in the upper-left corner:
The wrist guard protects the area below it from touches. Resting your wrist or finger on the wrist guard area does not register as writing or pinching. You can, though, continue a line of ink that you start above the wrist guard down into the wrist guard area.
The wrist guard moves automatically as you write, staying a fixed distance below the bottom of your writing after each stroke.
You can also drag the diamond to move the wrist guard up and down manually.
There are application-wide unzoomed wrist guard settings in the main App Settings. You can set the automatic separation distance between the wrist guard and your writing as well as where it assumes your wrist is relative to your fingers.
Zoomed Wristguard
When writing in Zoomed mode some people find that they want the Close-Up View to
be higher up on the screen so they can rest their wrist on the screen instead of
the iPad bezel or the desk.
You can do this by turning on the Zoom Wristguard using a Zoom Tool:
Zoom Tools
Zoom Wrist Guard ON
When the Zoom wrist guard is on, the Close-Up View is kept at a constant, small vertical size when the Separator Handle is dragged upwards instead of growing in size. This provides space below on which to rest your wrist.
Unlike the unzoomed wrist guard, which is remembered on a per-page basis, the zoom wrist guard setting is app-wide.
Wrist Guards and Multitasking Gestures
The four- and five-finger "multitasking gestures" introduced in iOS 5 can sometimes interfere with
the wrist guard when the system interprets your palm as some extra fingers.
You will see the screen wiggle or even start switching to another app.
The multitasking gesture functionality may be turned off in the iPad Settings' "General" section.
Support for left-handed and right-handed operation
By default, the app is set up for people who write with their wrist below the fingers they write with (or
hold a stylus with).
Buttons are generally in the far right or upper part of the screen to avoid accidental touches by your
palm. The Close-Up View is at the bottom of the screen for similar reasons.
The wrist guard blocks touches below your writing doing unzoomed editing.
This works for most right-handed and many left-handed people.
However, many other people, especially many left-handed people, write with their wrist above their fingers. The default layout and wrist guard operation do not work as well for them, and inadvertent touches become common. To help avoid this situation, there is a "Wrist Writing Position" setting on the App Settings (on the Managing Window) for indicating the assumed wrist position.
For those people who write with their wrists above their fingers, you can set the Writing Wrist Position setting to "Above writing" and then the layout and operation when editing will act differently than the default "Below writing." Buttons will display at the lower part of the screen, the wrist guard will block touches above your writing instead of below, and the Close-Up View will be at the top of the screen in zoomed editing instead of the bottom.
For those people who write with their wrists to the left of their fingers, the wrist guards are less helpful. In that case, a physical guard, like the one described in the Special Offers section of Help at the end, may be the best solution.
Support for right-to-left languages, such as Arabic and Hebrew
Zoomed editing is optimized for use with languages that are written from left to right.
To help those who write in a language that goes from right to left, such as Hebrew, Arabic, Farsi, Urdu, and Jawi,
there is an option to switch the operation to be optimized for right-to-left writing.
The behavior of many parts of the zoomed editing user interface, including Auto-Advance,
are changed by this option.
If you plan to use the right-to-left support, please read this help section carefully.
To switch to Right-to-Left Auto-Advance, first enable it by changing the "Right-to-Left Auto-Advance Enabled" app setting to "Yes". This has two effects: First, it enables the "Set Writing Direction to RTL/LTR" Zoom Tool. Second, it sets the writing direction to Right-to-Left. Once enabled, you can switch between Right-to-Left (RTL) and Left-to-Right (LTR) operation with that tool when doing zoomed editing:
Zoom Tools
Set Writing Direction to RTL
Set Writing Direction to LTR
When Right-to-Left operation is in effect there are many changes to the app. They include:
In RTL operation, the Advance and the optional Advance left buttons will switch to point the opposite direction and operate in the direction shown:


In RTL operation, Auto-Advance will work the opposite direction, with the gray area displayed on the right side of the Close-Up View. The logic used for detecting additional marks (used for dotted "i" and crossed "t" in Left-to-Right) is modified slightly to accommodate marks below the existing line. Basically, if a mark is small (less than about 8mm high and 10mm wide), it is assumed to be overwritten. If a mark is not small, it is assumed to be a new letter, and Auto-Advance will happen after it is completed.
In RTL operation, if you add diacritical and other marks (like a dot, shadda, etc.) to the most recent stroke where both some of the stroke and the marks are within the auto-advance gray area, it will not auto-advance (just like dotting an "i" in cursive English). However, if the stroke you are adding the mark to is not the most recent, such as when you have written a word that is made up of more than one stroke and then go back to add the marks to the first stroke, it will indeed auto-advance, which is probably not what you want. This situation may be more common in languages like Arabic. In that case, there are a few options: First, you can use manual advance. Second, you can add the marks after each partial-word stroke instead of after the whole word. Third, you can turn off the Auto-Advance gray area for one stroke by tapping within the Detail Area on the Page View and then adding the marks. Finally, you may set the "Right-to-Left Auto-Advance Trigger Width" App Setting to "Wide". This "wide" setting gives you more room before the Auto-Advance gray area shows up, making it more likely that a whole word will be outside of the gray area, especially when the iPad is in landscape orientation. The trigger point is changed from a small fixed amount from the left to about 3/4 of the width of the Close-Up View.
In RTL operation, the amount of indent of the Right and Left Margins will switch. The Return button will position the Detail Area to the left of the Right Margin. The Left Margin will be used to determine Auto-Return and the brown-dots area.
In RTL operation, the light-blue indication in the upper-right corner of the Close-Up View showing "Auto-Advance: On/Off" will now include "(Right-to-Left)" to let you know you are in that mode.
The direction state (RTL or LTR) is remembered by the app as you go from page to page, and doc to doc.
TEXT ON THE PAGE
This page covers how you enter and edit blocks of text on a page.
You switch to "Text Mode" when editing a page by pressing the Mode button and then selecting Typed Text:
Mode

Typed Text
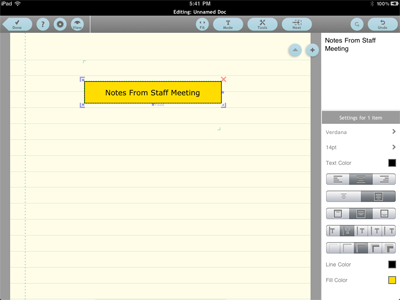
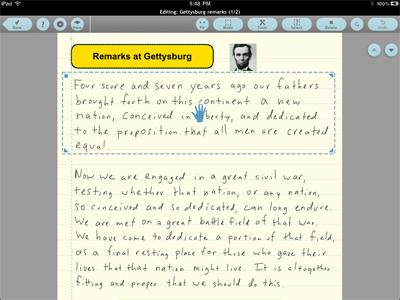
Here is what the Edit window typically looks like when you are editing a block of text:
The main area displays the Page View. You can pan by touching and dragging on the view and change magnification by pinching.
A rectangular block of text is shown here with an optional border and filled-in background. This block of text has been selected for edit, so there are light-blue editing handles around it for moving and re-sizing, and a light-red X for deleting.
All blocks of text (as well as shape and image objects) are shown with a dashed green outline when they may be selected for edit. The dashed green outlines are not shown when in ink editing mode.
The "Front-to-Back" order of ink, blocks of text, and other objects starts out as the order created. That is, you can insert a new block of text over ink and you can write new ink over an existing block of text. The background fill color (see below) of a block of text may be made partially transparent if desired. There are buttons (see below) to change the order.
SELECTING
You can select a block of text by tapping on it. You
can also switch to another block of text by pressing the "Next" button:

Next
If you are using an external keyboard to type in text, the Tab key will also switch to the "next" object.
You can de-select all objects by tapping outside of all objects.
You can select additional objects by pressing and holding on the additional object for more than 1/2 second. Some editing operations, such as moving, resizing, and changing color, apply to all selected objects. Others, like text editing, only apply to one of them.
UNKNOWN:.
When an object is selected it is temporarily displayed "in front" of everything else.
OTHER PARTS OF THE SCREEN
The white text box below the upper-right of the screen, the "Text Editing Box," displays the current contents of the selected block
of text.
You enter and edit text by tapping on the Text Editing Box and then typing text.
Please note: Even though you can see the text on the Page View, and double-tapping on it brings up editing, the place to tap to position the typing cursor is on the Text Editing Box. Actual editing takes place in the Text Editing Box and is immediately reflected on the page. This means that even if the magnification is such that the text appears very small, or is such that not all of the text is visible, you can still easily access and edit all of the contents of a block of text.
Below the Text Editing Box are the Settings Items. These are properties of the selected block of text. If there are no blocks of text selected, the default settings that will be applied to newly created blocks of text will be shown.
CREATING A BLOCK OF TEXT
To create a new block of text, either double-tap on the page, or, if nothing is selected, drag and drop
from the Text Editing Box.
Newly created blocks of text are automatically opened for text editing with the keyboard.
You can open existing blocks of text for text editing with the keyboard by
double-tapping on the block of text or by first selecting it and then tapping on the Text Editing Box.
You can also create a new block of text by selecting and then duplicating an existing block of text using the Duplicate Text Object tool:
Tools

Duplicate Text Object
New blocks of text are given the current default settings.
USING THE SELECTION HANDLES
You can move a block of text by dragging either the upper-left or bottom-left corner handles.
You can also move it by pressing and holding anywhere within the outline for more than 1/2 second and then dragging.
While moving, left and top guidelines are shown to help with placement relative to other objects.
You can resize a block of text by dragging either the handles in the middle of the right or bottom sides or by dragging the bottom-right corner handle.
AUTOMATIC HEIGHT
The height of a block of text is automatically increased to fit all of the text.
When this is in effect the word "AUTO" is shown below the outline.
If you manually resize the block to be larger than needed, the word "FIXED" will be shown.
BORDERS AND OTHER SETTINGS
You can use the Settings Items to customize the look of the block of text.
You can turn a border around the block on and off, adjust alignment of the text both
horizontally and vertically, adjust the padding between the border and
the text, and much more.
COLORS
There are settings for the text color, the border line color, and the background fill color within the border.
Tapping these settings brings up a color chooser.
The color chooser lets you switch between three methods of specifying color:
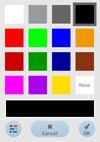
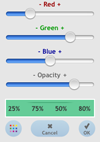
The first style lets you choose one of the colors by just tapping the color swatch. The second style lets you adjust the color more explicitly by using sliders. A sample is shown below the sliders which reflects the color as well as the transparency. The sample also indicates the color mixture being used as four values expressed in percent.
You switch between these two color chooser styles by pressing the toggle button in the bottom left of the chooser.
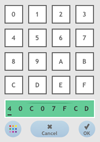
The third style is available for those who need to enter an exact color that is specified with the "Hexadecimal RGBA" style often used in web and computer programming. To switch to this style you first switch to the slider style and then tap on the color sample with the percentage numbers. Once in this color chooser style you can use the keypad displayed to enter a value. You can tap on the hexadecimal digits (0-9, A-F) in the sample to move to a specific part of the value.
CHANGING THE DISPLAY ORDER
You can change the relative display order of the currently selected objects by using
the "Move to Front" and "Move to Back" tools:
Tools

Move to Front

Move to Back
THE OTHER BUTTONS
The other buttons on the screen should operate in a manner similar to how they do in ink editing.
SHAPES ON THE PAGE
This page covers how you insert and modify the built-in shapes on a page.
You switch to "Shapes Mode" when editing a page by pressing the Mode button and then selecting Shapes:
Mode

Shapes
Shape mode is similar in many respects to Text mode. Selecting, moving, and modifying shapes works the same. The buttons and most components on the screen are the same.
What is different is how you choose and insert a shape, and the wider variety of options many shapes give you for customization.
The capabilities of the shape displaying system in this app are exploited by many of the shapes to give you more complex shapes than you might have encountered elsewhere. For example, the "Calendar" shape lets you adjust the starting weekday and number of days in the month using sliders.
When no objects are selected, a list of available shapes is displayed on the right side of the screen. The list is divided into sections. Each section indicates how many items are in the section and has a button for expanding the display to show all those items. Shapes are shown with a name and a sample.
The first two sections are dynamic. The Recent section lists up to five of the most recently used shapes. The Favorites section lists all of those shapes whose "favorite" button (the little box next to its name in the list) has been tapped.
INSERTING A SHAPE
To insert a particular shape on the page, just drag from its sample image in the list and drop on the
page where you would like the shape to be.
You can also insert a shape by tapping on the item in the list to select it and then double-tapping on
the page.
Finally, existing shapes on the page may be duplicated using the Duplicate button, just like blocks of text.
SHAPE SETTINGS
Each inserted shape has its own settings.
You can use these settings to customize that instance of the shape.
There is no way to change the default starting values.
Some shapes have a very extensive group of settings, including sliders and additional choice buttons.
Make sure that you experiment with those settings to see the range of options available to you
for customization.
Many are options that you may not have encountered with other applications.
The first row of the settings of each shape displays the name of the shape. If you tap on that row additional information about the shape may be displayed.
Some shapes let you type in text that is displayed as part of the shape. This works similarly to blocks of text, but does not have Automatic Height adjustment. Text that doesn't fit may be truncated.
Sometimes part of a shape will extend past the dashed green outline. Be aware that the extents indicated by the outline are used by the app for determining when a part of a shape is to be displayed or selected in Select Mode. It does not use the visible, rendered shape for that determination.
IMAGES AND PHOTOS ON THE PAGE
This page covers how you insert and modify images on a page.
You switch to "Images Mode" when editing a page by pressing the Mode button and then selecting Images:
Mode

Images
Image mode is similar in many respects to Text mode. Selecting, moving, and modifying images works the same, except that the aspect ratio of the image is fixed when resizing. The buttons and most components on the screen are the same.
What is different is how you choose and insert an image, and the specific options you have.
When no objects are selected, a list of images, if any, in the File-Import Folder are displayed, as well as means for selecting images in Photo Albums or on the iPad Pasteboard. (See the "File Sharing" Help topic for more information about the File-Import Folder. It is not a "folder" like those that hold docs or sub-folders. It is a file directory used in various parts of the app.) If the iPad has a camera, there is also an option to use it to capture an image.
The image extensions handled are "jpg", "jpeg", "png", "gif", and "bmp". The transparent parts of PNG and GIF images will be transparent.
INSERTING AN IMAGE
To insert an image or photo, tap on the appropriate row in the list.
Files in the File-Import Folder or on the Pasteboard will be inserted directly, while the
"Choose From Photos" and "Photo from Camera" rows will bring up a popover to let you obtain
the particular image.
The image being inserted is copied into the page data.
THE COPIED IMAGE MAY HAVE ITS RESOLUTION CHANGED
The copy of the image that is inserted
is automatically resized from the original if necessary to be no larger in any dimension than
that specified by the "Maximum Import Resolution" setting displayed at the end of the list.
This size does not affect how large you may make the image on the page.
It only affects how much resolution (detail) is maintained.
The larger the resolution (i.e., the more saved detail) the slower the image will display, no matter
what size it is on the page.
Once copied, the resolution may not be changed for a particular image without re-inserting it
(or using cropping as explained below).
Newly inserted images are given the default image settings.
IMAGE SETTINGS
Once inserted, you may rotate the image, add an optional border, and type in a caption.
Tapping on the first row of the settings will display extra information about the image,
including how it was created and its resolution.
You can crop the image using the "Crop Image" setting. This brings up a screen showing the entire original image and the current crop inset regions. You adjust the crop by dragging outside of the image on the side or corner you wish to crop (or uncrop). The original, full resolution of the image is used to create the cropped result. The result may have its resolution reduced as specified by the current Maximum Import Resolution setting. This means that a high-resolution photo can be cropped to maintain the detail of part of the image, and an existing image may be "cropped" and "uncropped" to resave at a different maximum resolution.
Note that there may be a limit to the original size of an image that can be handled by this app due to runtime memory constraints.
If there are no images selected the default settings to be applied to new images will be shown. You may modify these to affect subsequently inserted images.
DELETING IMAGES IN THE LIST
If you swipe on a row in the list of files from the File-Import Folder you will
be given the opportunity to delete that file from the folder.
Note that this operation may not be undone.
SCREEN CAPTURE
If you want to use an image of how the iPad screen looks when running another app,
such as a browser displaying a particular web page,
you can use the iPad's screen capturing feature.
In the other app get to a state where the screen looks the way you want.
Press the Home button and the Power button simultaneously.
The screen will blink, and then a copy of what was on the screen will be
saved in the Photo Albums.
You can then switch to running Note Taker HD and insert (and then optionally crop)
this new image just like any other photo.
CLIP ART
The app support web site, www.notetakerhd.com, includes various images for download that you
can use to enhance your notes.
SELECTING INK AND OTHER OBJECTS
This page covers how to move and do other operations on ink and other objects.
You switch to "Select Mode" when editing a page by pressing the Mode button and then selecting Select:
Mode

Select
Here is what the Edit window typically looks like when you are in Select Mode:
The main area displays the Page View. You can pan by touching and dragging on the view and zoom by using pinch.
A "Selection Rectangle" is displayed in light blue. It has handles on the upper-right, bottom-left, and bottom-right corners for resizing, and one in the upper-left corner for repositioning. You can also position the Selection Rectangle by tapping elsewhere on the page or by dragging in the clear area inside the rectangle.
DETERMINING WHAT IS SELECTED
Ink and objects within the Selection Rectangle are considered selected for operations in this mode.
You have some extra control over exactly how that selection is done.
You do this by using the Select button:

Select
There are settings for each of the modes (Ink, Text, Shape, and Image) that you may toggle on and off by tapping on their row:

Include Ink

Include Typed Text

Include Shapes

Include Images
If the row has a dark background then that type of object is selected. If it is a light background then that type will not be selected. This, for example, lets you move ink and shapes without moving an image behind them.
The "bounding box" around an object is also used to determine if it is selected. This is the upper-most, right-most, lowest, and left-most part of a continuous "stroke" of ink. Text, shapes, and images are bounded by their dashed green outline (some shapes extend past that visually but only the outline is used for selection).
The "Selection Inclusion Setting" is used to determine how much an object must overlap the Selection Rectangle to be considered selected. This setting has two options: Within and Overlap:

Select Within

Select Overlapping
If the first option is chosen, then bounding boxes must be completely within the Selection Rectangle to be considered selected. If the second option is chosen, then any amount of overlap is sufficient to be considered selected.
OPERATIONS ON SELECTED OBJECTS
There are six main operations that you may perform on selected objects.
The first main operation is the triad of Copy, Cut, and Paste:
Tools

Copy

Cut

Paste
Copy and Cut put special "Note Taker HD Format" data on the pasteboard that may be pasted onto the same page or another page in any document.
The Paste tool is only shown when such data is on the pasteboard. Pasted material is placed in the same position on the page as it was when copied or cut. You can drag that material around on the page to position it and then press the Paste button that will appear at the top of the screen to finalize (or the Cancel button to undo the paste):
Paste
The second operation is moving. You may move the selected objects on the page (without needing to do a cut/paste) by pressing on the "hand" in the middle of the Selection Rectangle and then dragging to a new position:

The third operation is deleting (without first copying to the pasteboard). You may delete the selected objects by pressing the Delete button:

Delete
The fourth operation only applies to selected ink strokes. It lets you specify a new color or line thickness for the selected ink:
Tools
Change Ink
The fifth operation also only applies to selected ink strokes. It lets you resize, rotate, and/or reposition the selected ink:
Tools

Resize/Rotate Ink
The triangle handles that will display in the corners of the selection rectangle let you resize the selected ink horizontally, vertically, or equally in both directions. The square handle lets you reposition the ink. Dragging on the dashed-line circle lets you rotate the selected ink. Once you touch down on the circle, if you continue dragging on or within the circle, ink will be rotated in 15 degree increments. If you continue dragging outside of the circle, rotation will be continuous. Press the Confirm button that will appear at the top of the screen to finalize (or the Cancel button to undo all the changes):
Confirm
The sixth operation lets you change the relative display order of the currently selected objects and/or ink strokes. You use the "Move to Front" and "Move to Back" tools:
Tools
Move to Front
Move to Back
THE OTHER BUTTONS
The other buttons on the screen should operate in a manner similar to how they do in ink editing.
MULTI-PAGE DOCS
You can have more than one page of "paper" for each doc.
A multi-page doc is like a small notebook, looseleaf binder, or folder.
It appears in the list of docs as just a single thumbnail of the
first page along with a number in the bottom right corner
of the thumbnail indicating the total number of pages that make up that doc.
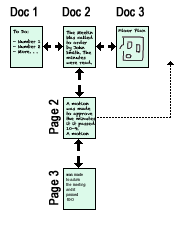
Here is an illustration showing the docs going across and the pages that make up Doc 2 going down:
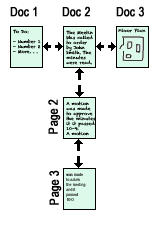
The direction of the arrows in the illustration correspond to the direction of the arrows on buttons in the app.
There are various tools and other functionality throughout the app to facilitate use of multiple pages. Many of them are described below.
Switching between a doc's pages
When a doc has more than the default initial single page, the following buttons will appear on or above the Page View
as needed while editing or viewing:
Pressing these buttons changes which page is displayed.
Adding a new blank page to a doc
When you are editing the last page of a doc, the following button will appear instead of the "Next Page" button:
Pressing the "+" (Add Page) button will prompt for confirmation before creating a new blank page since it is easy to press accidentally when looking through multiple pages. Tap the red "Yes" button that appears to confirm.
The new page will start with the same background, pen color, etc., as the page you were editing when you pressed the Add Page button. (Pages added to Annotation Docs will be normal pages without the PDF file as a background.)
There is also an Insert Page Editing Tool (accessed with the Tools button) to insert a blank page after any page.
Duplicating a page
When you are editing any page on a doc you can use the Duplicate Page Editing Tool (accessed with the Tools button)
to add a duplicate of that sheet to the page:

Duplicate Page
The new page will start with the same background, pen color, etc., as the page you were editing when you pressed the Tools button.
Seeing a list of all of a doc's pages
When you are viewing a doc that has multiple pages (by pressing the View button while
editing), the List button will appear above the Page View:
Pressing the List button toggles the list of pages on and off. The list will appear to the right of the Page View. It consists of a scrolling list of thumbnails of each page. Tap on a thumbnail to switch to viewing that page. Double-tap the thumbnail or preview to switch to editing that page.
Below the list of pages are three buttons: Edit List, First, and Last. The First button selects the first page of the doc. The Last button selects the doc's last page. The Edit List button enables list edit controls for deleting pages and reordering the pages.
Deleting pages, changing the order of pages
To delete pages or change their order you use the list of pages
while viewing a doc during edit (see the previous section of this help topic above).
You press the Edit List button to turn on normal list editing.
Delete a page by pressing the red circle and confirming. Reorder pages by pressing and holding on the three gray bars on the right side of the thumbnail and then dragging the page to a new position with respect to other pages.
Pages may also be deleted with the Delete Page Editing Tool or the Delete Pages Tool on the Managing Window when viewing a list of pages:

Delete Page
Delete
You access the Delete Page Editing Tool from the Tools button when editing the page.
You can access the Delete Pages Tool on the Managing Window when viewing a list of pages. The Delete Pages Tool lets you select one or more pages to be deleted. There is a "Select All" button to make it easier to delete many pages at once.
Pages may also be removed by using the Unstaple Page Editing Tool or the Unstaple Pages Tool (which are described below):

Unstaple Page

Unstaple
Finally, pages may also be reordered using the Reorder Pages Tool on the Managing Window when viewing a list of pages:

Reorder
"Stapling" pages as a single multi-page doc
There are times when you want to take one or more docs, each with either
a single or multiple pages, and add them to the pages of another doc.
This is like "stapling" those docs onto the back of that other doc.
To do this, first, in the List of Docs in the Managing Window, find the doc you want to be the master doc that you are stapling the other docs to as extra pages. Tap the "Staple" tool:

Staple
Checkboxes will appear next to the docs in the list. Select the ones you wish to change into extra pages by tapping on them to display a checkmark. Press the Done button in the tools area when you are finished selecting the docs. Finally, you will be asked to confirm that you want to do the operation since it is tedious to reverse. A progress bar will show the progress if the operation is on a large number of pages.
Here is an illustration of what this operation does, showing the checkmarks and the docs being changed from being in the list of docs to being in the list of pages for the one doc:
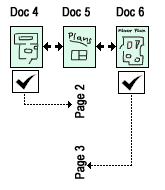
To change a page back from being an extra page on a doc to being a single standalone doc in the list of docs, use either of the "Unstaple" Page tools described next.
One way to use this stapling tool is to use filtering in the list of docs to display all of the docs tagged with a particular tag. While viewing that list, the Staple tool will only list those tagged docs. This makes it easy to choose one or more of those tagged docs and create a single doc that includes them all.
Making a page a "standalone" doc by unstapling
You can take a page out of the list of pages for a doc and make it a plain, single page doc
of its own in the list of docs.
You do this by using the Unstaple Page Editing Tool or the Unstaple Pages Tool.
Here is an illustration:
To access the Unstaple Page Editing Tool you must be editing the page you wish to make standalone. Press the Tools button and select Unstaple Page:
Unstaple Page
The page you were editing will then be removed from the list of pages it was in and you will be returned to the Managing Window with that page now in the list as a doc. It will be given a name derived from the name of the doc it had been part of. It will be tagged with the same tags as the original doc, but will not be set as a favorite and will have no flags set.
Alternatively, you can access the Unstaple Pages Tool from the list of pages in the Managing Window. The Unstaple Pages Tool lets you select one or more pages to be unstapled. There is a "Select All" button to make it easier to unstaple many docs at once.
Outputting individual pages
The normal Output tool on the list of docs adds all of the pages in a doc
to the PDF files it creates.
If you wish to send just selected pages to others there are two options.
There is an Output Tool associated with the list of pages in the Managing Window. This tool lets you select which pages of a doc are to be output as a multi-page PDF file. There is a Select All button to make it easier to select all or most of the pages when you have a doc with many pages. Tap the rows for individual pages to toggle the selection checkmarks.
Alternatively, when editing a page, one of the tools available from the Tools button is the Email as Image tool. This emails just that one sheet as a JPEG image.
PDF Annotation Docs as multi-page docs
An Annotation Doc that is created by importing a multi-page PDF file appears as a single multi-page doc.
Each page corresponds to successive pages of the imported PDF file.
See the help topic on PDF Annotation Docs for more information.
FOLDERS
The pages you write on are organized into docs, each doc made up of one or more pages numbered starting with page 1.
The docs are organized into folders.
When you view the contents of one of these "Folders of Docs" you will see each doc represented by a thumbnail of part of the first page along with an optional name that you provide. Each folder, in turn, has a name that you type in. The default initial folder is named "First Folder" (which you can rename). The folders are listed in a List of Folders in the Managing Window.
Each doc may only be in one Folder of Docs, though you can easily move or copy docs from folder to folder using the "To Folder" tool. The listing of docs only shows the contents of one Folder of Docs at a time.
You can display the contents of a folder by either tapping the ">" to the right of the name, or by double-tapping on the name:
Folders of Docs vs. Folders of Folders
In addition to Folders of Docs, you can have Folders of Folders.
These are folders that can have sub-folders.
Like Folders of Docs, Folders of Folders are listed in the Managing Window.
The Top Level listing of folders is a Folder of Folders and can contain both Folders of Docs, such as the "First Folder" and "Templates", as well as Folders of Folders that you create.
When you create a new folder by using the "+" button above the list, you will be given the option of either creating a "Folder of Docs" or a "Folder of Folders":

Create New Folder of Docs

Create New Folder of Folders
Note: Folders of Docs can only contain docs, and Folders of Folders can only contain folders.
The folders in a Folder of Folders may be any mixture of Folders of Folders and Folders of Docs.
You view the listing of sub-folders within a Folder of Folders by either tapping the ">" to the right of the name or double-tapping on the name. If you are viewing the contents of a Folder of Folders you can change to view the contents of the containing "parent" folder by pressing the "Up" button:
Up
When you are viewing the list of folders you can use the Move Folder tool to move a folder and its contents (docs and folders) to somewhere else in the hierarchy of folders:

Move Folder
Examples
Here is an example of how you might use both Folders of Folders and Folders of Docs:
Create two top level Folders of Folders named "Semester 1" and "Semester 2."
Press the ">" next to Semester 1 to view its empty contents.
Use "+" to create Folders of Docs with names like "Math", "Chemistry", and "History."
In Math you could put docs like "Lecture 4 Notes" and "First Report Ideas."
As a different, visual example, here is an illustration showing the Top Level of the listing of folders with a combination of Folders of Docs and Folders of Folders:
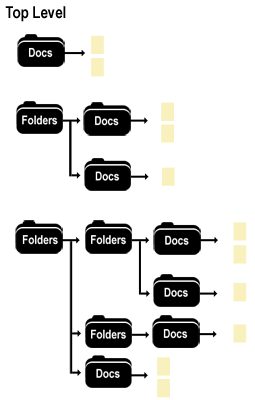
NOTE: There is no specific limit to the depth of folders within folders, however, the total number of characters in a folder's name and the names of all of its parent folders (each plus one character) is limited to about 200 characters.
PAGE AND DOC SETTINGS
The Page Settings page lets you view and modify many of the attributes of a
doc or the currently displayed page all in one place. It is accessed by pressing the Page Settings button in the upper-left side of the screen while editing
or viewing the doc, or with the Doc Settings tool when viewing the list of docs
or the Page Settings tool when viewing a list of pages on the Managing Window.
The particular settings you will see depend upon how you arrived at the settings page. Some of the settings apply to the doc and some to only a particular page.
The individual settings are as follows (in order from top to bottom):
Name
This is the name of the doc that will be listed in the list of docs.
Tap the row to edit.
It does not have to be unique.
A blank name is treated as "Unnamed Doc."
You can also rename a doc when editing by tapping the name at the top of the screen,
or when viewing the list of pages by tapping the name shown above the page preview.
All pages of a doc share the same name.
There are App Settings to customize the initial doc name instead of using the default blank name. You can specify special fields such as the creation date to include in that initial name. See the App Settings help page for more information.
Thumbnail
The current thumbnail for the page is displayed (or the first page if you are only viewing doc settings).
Tapping the setting switches to the thumbnail cropping page.
In a multi-page doc, each page has its own thumbnail setting.
The first page's thumbnail is displayed on the list of docs.
The other pages' (if any) thumbnails are displayed in the lists of pages for the doc.
If cropping is set to "Automatic" (the default), the app automatically chooses the area to show in the thumbnail. The area chosen varies dynamically with the width of the ink that you write, within certain limits to keep things somewhat readable. During editing you will see green crop marks that indicate the currently chosen area.
By setting cropping to "Custom," or by just dragging and/or using the pinch gesture, you can set an explicit area of the page to be used for the thumbnail.
There is a Home button to move the upper-left corner of the page to the upper-left corner of the thumbnail. There are also Size to Width and Size to Height buttons. Double-tapping on the page also moves it to the upper-left and cycles between different magnification levels.
Favorite
This indicates whether or not the doc will be considered a "Favorite" when filtering on favorites.
Tapping the setting toggles the setting on and off.
Favorite Later
This indicates when the doc will become a "Favorite."
You can set that time to various points in the future.
This is a simple way to indicate a doc that may be of interest in the future.
Tags
The tags set for this doc are shown.
Tapping on the setting brings up a list of current tags.
You can choose one or more of those by tapping on them.
Tap again to deselect a tag.
You can also press the Edit button there to create new tags,
rename tags, delete tags, and/or reorder the tags.
Flag
You can choose an optional color to be associated with the page in the list of docs as
an additional means of organizing.
For example, it gives you a way to find particular docs when scrolling through a long list.
It may also be used when filtering the list of docs to display.
Different flags have no special meaning to the app.
Background
You may choose between the following built-in backgrounds: Narrow Lined, Wide Lined (the initial default), Narrow Grid,
Wide Grid, Wide Lined No Title Area (similar to that used on the iPhone Note Taker 2.0 app), and Blank (no lines).
The initial value for the background of a new doc may be set on the the App Settings.
Instead of using one of the built-in backgrounds, you can choose a custom Background Image. These are created using either an image, such as a JPG file, or a page of a PDF file. See the the Background Image List help page for more information.
In an Annotation Doc, the Background can come from the imported PDF file as determined by the Imported PDF File For Annotation page setting described below.
The background is a separate setting for each sheet in a multi-page doc.
Background Color
You may choose between the following colors: Light Yellow (the initial default), Yellow (like many paper pads),
Light Green (used in older versions of this app), White, and Light Gray.
The initial value for the background color of a new doc may be set by using a Template Doc for creating the doc.
Template Docs are those that are in the "Templates" folder.
The background color is a separate setting for each page in a multi-page doc.
Page Layout
You may specify different layouts for the page, such as portrait (narrow and tall) or landscape (wide and short).
There are five built-in page layouts that correspond to the aspect ratios (width vs. height) of different types of pages: Portrait (aspect ratio of 1:1.3 to correspond to 8 1/2" x 11" paper), Landscape (1.3:1 to correspond to 11" x 8 1/2" paper), Computer Screen (4:3 to correspond to a VGA), A4 Portrait (1:1.414... to correspond to A4 paper), and A4 Landscape. In addition, imported PDF Annotation Docs get a "custom" page layout based on their actual size that is expressed as two large integers.
The page layout is a separate setting for each page in a multi-page doc.
Changing the page layout when there is already ink on the page can change the ink's position with respect to the background. Page layout changes that would otherwise clip ink require confirmation that you want the existing ink to be shrunk to fit the new dimensions.
Line Spacing for Return
This setting brings up a Line Spacing screen.
It is used to set the amount that the Return button, and Auto-Return, move
the Detail Area.
See the Page Editing help topic and read the sections about "Return" and "Line Spacing for Return"
for more information.
Right Margin in Zoomed Editing
When doing Zoomed editing and Auto-Return is turned on, the position of the Right Margin is displayed in the
Page View.
This position is used to determine when to display the "brown dots" that appear in the Close-Up View when
the Detail Area is near the right edge of the page.
You can change the position by dragging the bottom of the Right Margin line.
See the Page Editing help topic for more information about "Auto-Return".
This setting lets you switch back to the default "90% of page width" amount from an explicit setting (which is expressed in a specific number of units). If you select "Custom" an initial value of 500 units will be used. You can then modify that value by dragging the Right Margin line on the screen.
Imported PDF File For Annotation
If the page was created as part of an Annotation Doc by importing a PDF file, this setting lets you review and optionally
change which page of the original file this page has as a background.
This setting displays the page number in the PDF file, the comment about the import, and the Output as PDF setting. Tapping this setting lets you change these, including making this particular page be a normal page without the background from the PDF file.
See the PDF Annotation Docs help topic for more information.
Doc Default Output as PDF for Annotation Pages
This is a doc setting.
If a page was created as part of an Annotation Doc by importing a PDF file, this setting lets you
specify that all pages are to be output as either images of the PDF (needed for some problem
PDF files) or to be output as specified in the particular page's Output as PDF setting (the normal default).
See the PDF Annotation Docs help topic for more information.
Statistics
This is the number of points and strokes (points from finger down to finger up)
in the page. It is for possible use in technical support, but you can normally ignore it.
Currently, there is a maximum of about 150,000 points in 20,000 strokes per sheet.
There is also a maximum number of steps that may be undone (about 20,000 points added or removed with
the normal edit eraser, different maximums for Selection Mode changes depending upon how many points are changed).
Tapping this row, when viewing a doc's settings, will display a listing of the contents of the file system directory containing the doc's contents. This is mainly for support and testing purposes.
Other Values (including Date/Time Created)
This shows the internal name of the doc or page data, which is stored as a text file.
Tapping it displays the contents of that file (which may take a few seconds to display).
This is mainly for possible use in technical support so you can ignore it.
The date and time the page was originally created is also displayed. This is a value stored in the file by the app.
EDITING TOOLS
Tools
The Editing Tools button is displayed above the Page View when you are editing a doc. There is also a Zoom Tools button to the right of the Close-Up View when doing zoomed editing. The both bring up a popover with command rows that lets you choose what you want to do with what you have written on the page.
The Editing Tools are:
Wrist Guard ON/OFF
Wrist Guard ON
Wrist Guard OFF
Doc Name

Doc Name
Page Thumbnail

Page Thumbnail
Duplicate Page
Duplicate Page
Insert Page

Insert Page
Blank pages added to Annotation Docs will be normal pages without the PDF file as a background. They are like plain sheets of paper inserted between the original "printed" pages.
Unstaple Page
Unstaple Page
Delete Page
Delete Page
Transcribe
Transcribe
The Transcribe page displays a scrollable area on the left showing a section of the page. You can drag this image to view different parts, and you can use the two-fingered pinch gesture to change magnification.
The right side of the Transcribe page has text boxes for transcribing information, such as name, address, and phone number. Tap the field you wish to edit to bring up a keyboard. Move from field to field by pressing the "Done" button on the keyboard or by tapping on another field. Dismiss the keyboard by tapping outside of the fields. The list of fields is scrollable.
THE TRANSCRIBE SAVE BUTTON
The Save button in the upper-right corner of the Transcribe page does different things depending upon which tab has been selected in the tab bar at the bottom of the screen:
The Contacts tab indicates that a screen should be displayed for choosing a person. Choose the person record to which you wish to add the new data. Fields left blank are not added. Default values are used for settings such as Home/Work, etc. You can switch to the Contacts app to update those. There is a Clear All button to clear the values of all fields (including the Transcribe text area) if they still have unneeded values from a previous use on the page.
The New Contact tab indicates that a new person record page should be displayed, filled out with the data you have typed. You may then do any other edits to the new contact, and then save or cancel.
The Transcribe tab lets you fill out a single text area that can show more text than the other fields. This value is stored with the page (or sheet in a multi-sheet page) and may be viewed or edited at a later point. Pressing the Save button copies the entire contents of that text area to the pasteboard for pasting into other apps or into a block of text in this app. Instead of a Done key on the keyboard, you can include Returns in your text.
The Transcribe value has no special meaning to the app except that it is kept with the page and is available for inclusion in the footer in output. It is provided to give you an easy way to simultaneously view what you wrote in ink on a page and type into a text field. While the Contacts information is automatically passed on to the standard contacts editing system on your device when you press Save, the Transcribe information is just copied to the pasteboard. This allows you to manually use it in this or other apps if you wish by tapping in a text field and choosing Paste.
Email as Image

Email as Image
Some people have found these images useful when sent to other systems that do handwriting recognition.
There are App Settings for setting default values for the To:, Subject:, and message body fields.
Add to Photos

Add to Photos
Set Pen Presets

Set Pen Presets
VGA Fit Width/Height

VGA Fit Width

VGA Fit Height
Show/Hide VGA Pointer

Show VGA Pointer
Hide VGA Pointer
Other Tools
These are additional tools that appear at the top of the Editing Tools list
when you are in Typed Text, Shapes, Images, or Select mode:
Move to Front
Move to Back
Duplicate Text Object
Duplicate Shape
Duplicate Image
Change Ink
Copy
Cut
Paste
Resize/Rotate Ink
Zoom Tools
The Zoom Tools are described on the Page Editing help page.
They are:
Turn Auto-Advance ON
Turn Auto-Advance OFF
Zoom Small
Zoom Large
Pen Pen Presets
Pen Attributes
Erase
Advance Left
Set Return Spacing
Set Writing Direction to RTL
Set Writing Direction to LTR
Zoom Wrist Guard ON
Zoom Wrist Guard OFF
THE MANAGING WINDOW
The Managing Window is lets you organize and operate on folders, docs, and pages.
It has three main modes where it displays a list of folders, docs, or pages on the left side
and provides a preview and tool area on the right.
Here is what it looks like when listing docs, as well as samples of the listing part of folders and pages:
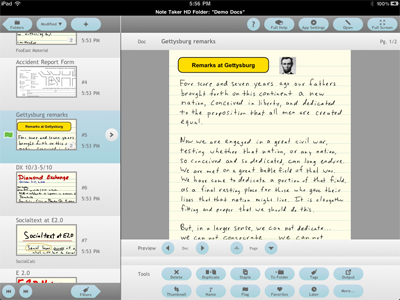
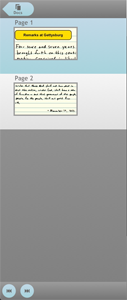
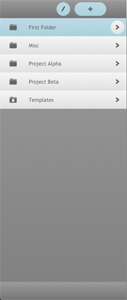
Switching between folders, docs, and pages
When you are viewing the list of docs, such as shown above in the larger image,
you can switch to viewing the list of folders (the right-most image) by tapping
the Folders button above the list:
Folders
You switch from the list of folders to the contents of a folder (either docs or sub-folders) by tapping the ">" next to a folder or double-tapping:
You switch from the list of docs to a list of its pages by either selecting the doc by tapping on it and then tapping the ">", or by pressing and holding on the thumbnail for 1/2 second and then releasing.
You switch from a list of pages to the list of docs by pressing the Docs button above the list:

Docs
You switch from a list of folders within a folder (a "sub-folder") to the containing "parent" folder by pressing the Up button above the list:
Up
Creating a new doc: Default Blank, Template Docs, and Annotation Docs
You create a new doc by pressing the "+" (Add New Doc) button above the list of docs.
That will bring up a list of the types of docs that you can create.
Tap one of the doc types to create a new doc.
By default, there is only one type, the "Default Blank Doc," whose properties are specified by the App Settings. You can, though, make any doc a "Template Doc" that will be duplicated for use as the new doc. Template Docs are all of the docs in the "Templates" folder. The names of those docs will appear in the add new doc list in the doc order (not the modified order usually displayed) of that folder. All of the ink, settings, tags, etc., of the template doc are copied, except for the doc name. Template docs may be single page or multi-page docs.
If you select "Annotate PDF File" when adding a new doc, you will be taken to the Create Annotation Doc window. This will let you select an imported PDF file to be made available for viewing and annotation. Annotation Docs may also be created by sending a PDF file to this app using "Open In..." in another app. See the PDF Annotation Docs help topic for more information.
The support web site, www.notetakerhd.com, has an Extras section with sample Template Docs that you might find helpful. See the web site for more information.
Folders: Creating a new folder, sub-folders, and Folder List Edit Mode
You create a new folder by pressing the "+" (Add New Folder) button above the list of folders.
That will bring up a list of the two types of folders that you can create:
a folder containing docs or a folder containing other folders (i.e., sub-folders).
Create New Folder of Docs
Create New Folder of Folders
NOTE: Folders of Folders can only be created in either the top level of folders, or within another Folder of Folders. Documents can only be created in Folders of Documents. You cannot have a folder within a Folder of Documents and you cannot have a doc within a Folder of Folders.
Tap one of the folder types to create a new folder of the desired type. You will then be given an opportunity to give the new folder a name, and then the app will switch to the Folder List Edit mode, displaying the list of folders on the right.
In the Folder List Edit mode you can rename a folder by tapping on its name, or, if the folder is empty, delete it by pressing the red "-" button to its left and confirming.
Remember: Only empty folders may be deleted.
You exit from the Folder List Edit mode by pressing the Done button.
You can return to the Folder List Edit mode by pressing the Edit button above the list of folders:
NOTE: There is no specific limit to the depth of folders within folders, however, the total number of characters in a folder's name and the names of all of its parent folders (each plus one character) is limited to about 200 characters.
There is more information about folders in the Folders help topic.
Selecting a doc for preview or edit
You select a doc by tapping its row or thumbnail in the list on the left.
A preview will be displayed on the right side of the screen.
If the doc being previewed has more than one page, Next Page and Previous Page buttons will appear on the preview as appropriate. There are buttons below the preview for switching to the next or previous doc in the list. You can tap on the doc name displayed above the preview to rename the doc.
You can also switch between docs by swiping (touching and dragging, then releasing) from left to right (next doc) or right to left (previous doc). You can switch between pages of a doc by swiping up (next) or down (previous).
You can see a larger preview by pressing the "Full Screen" button:
Full Screen
When viewing full screen you can display the top toolbar by tapping once on the screen. The toolbar has an "Exit Full" button, as well as a button to display a list of pages.
To return to editing a doc on the page where you last left it, press the "Open" button in the upper toolbar:

Open
Double-tapping on the preview will switch to editing the doc on that page.
Double-tapping on the doc thumbnail (which comes from the first page of the doc) will switch to editing the doc on that first page.
Deleting a page
To delete a page you use Delete Page(s) tool. This is described
on the Managing Window Tools help page.
Help
You can view these help pages by pressing the Full Help button in the upper toolbar.
There is also a short form of help about this window available by pressing the "?" button.
The Doc List Itself
Each doc is shown with a thumbnail image of part of the first page, the doc's name, when it was
last edited, the doc number, a list of any tags assigned to it, and whether or not it is a favorite
(a little heart character is displayed if it is).
Flags are also shown if set for the doc.
If the doc has more than the one page it will have the current number of pages in the bottom-right
corner of the thumbnail.
Above the list of docs is a button that lets you choose the sort order. You can specify listing in order of modification or creation, listing alphabetically by title, and listing by doc number.
Modified ▼
Below the list of docs, and often other lists, you will find buttons to select the first or the last item in the list:
Below the list of pages for an annotation doc, you will see a button that toggles between "Ink" and "All" which allows you to filter the displayed list to only show pages that have annotation on them (ink, text, shapes, or image):

Ink
Filtering and Layout
Below the list of docs is a button to replace the preview with filtering and layout settings:

Filters
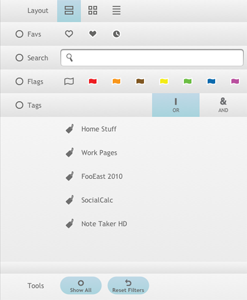
The Layout setting in the first row lets you change how docs are displayed in the list:


The first setting displays the docs in the default 1-per row format with thumbnails and other information, the second setting displays two docs per row, and the third displays 1-per row without thumbnails.
The other setting rows are filters and each have selection buttons on the left. If the selection button is "On" (filled in circle) the filter is active.


Tap the button to toggle on and off. Modifying a filter setting will automatically turn it on.
When any filter is active the words "Filtered List" will appear in a row above the list of docs:
Filtered List
Tapping the Filtered List row will turn off all of the filters.
The first filter is the Favorites filter:


This filters doc based on whether they have been designated as favorites through use of settings or tools. You can use this feature to more easily find docs you refer to frequently, but don't modify frequently, or to group them for any other purpose. The settings are: Show docs with favorite off, show with favorite on, and show those that have been designated as "Favorite Later." By setting a page as a Favorite Later, you can use the app to remind you of things in the future. This is similar to having a pile of notes, and having a note that you put into the bottom of the pile that automatically moves nearer to the top at a later time so it won't be forgotten.
The second filter, Search, lets you list only docs that have specified text in the doc name.
The third filter, Flags, let you list only docs that have a Flag setting of any of the values you specify:


The first selection means "no flag set." You can set a doc's flag through a tool or the Doc Settings.
The last filter is the Tags filter. When active, this filter lets you list only docs that are tagged with the specified tag. The tags for a doc are set using the Tags tool or Doc setting. If no row is selected here, then only pages with out tags are listed. Otherwise, only pages with the specified tags are listed.
You specify whether a doc must have any of the specified tags or all of them using this setting:

OR

AND
You can add new tags, change the order in which they are listed, rename them, and delete them when using the Tags tool or from the tags list in the Doc Settings.
There are two tool buttons below the filter settings. The first turns all of the filters off (but leaves the settings themselves unchanged so you can reactivate them). The second resets all of the filters to the default values.

Show All

Reset Filters
You return from setting the filters to previewing the doc and using the doc tools by pressing the Preview button below the list of docs:

Preview
App Settings
The App Settings button in the top toolbar lets you access the settings for the app:

App Settings
The App Settings have their own help page.
Tools
There are a variety of tools available through buttons in the Tools area
in the bottom right part of the screen.
They are described in the Managing Window Tools help page.
MANAGING WINDOW TOOLS
When viewing the Managing Window you will usually see a variety of tools
in the Tools section in the bottom right part of the screen.
Which particular tools are visible depends upon which listing is being shown.
To invoke a tool, tap on the button.
DOC LISTING TOOLS
Delete Doc(s)
Delete
Select the doc(s) you wish to delete by tapping. Press the Done button to delete the docs. You will be asked to confirm the deletion before it is actually done. This operation cannot be undone.
If the doc has more than one page, all pages are deleted.
Duplicate Doc

Duplicate
This tool creates a new doc that is a copy of the selected doc and then selects it. The name of the new doc will be "Copy of " followed by the name of the original doc. Tags and flags are copied, but favorite and favorite later settings are not copied.
You can duplicate a multi-page doc -- all of the docs will be included in the copy. You can also duplicate an Annotation Doc.
Staple
Staple
This tool lets you add other docs as additional pages of the selected doc. Select the docs you want to convert to extra pages, then press the Done button. If a doc being added has multiple pages of its own, all of those pages will be added, too.
Note that a doc's pages may be made standalone docs one at a time by using the Unstaple Page editing tool or in a batch with the Unstaple Page Managing Window tool.
Tags

Tags
The Tags tool brings up a list of all the tags. You can create new tags with the "+" button and modify the list by pressing the Edit List button:
When editing the list of tags, use the red icon on the left to delete tags. Use the move icon on the right to reorder them for display. Tap on a tag name to bring up an edit field where you can use the keyboard to edit the tag's name. Press Done to exit editing the list of tags.
If you rename or reorder a tag, all pages assigned that tag will now display the new tag name and the order shown in all tag lists will change appropriately.
The operation of the Tags tool depends upon this setting:

Tags for Doc

Docs for Tag
If the setting is Tags for Doc (the default), then the list will show the tags for the selected doc. Tap the tag rows to assign and unassign that tag to the doc.
If the setting is Docs for Tag, then tapping on a tag row will display as chosen all of the docs with that tag. Tap a doc to tag it or untag it with that tag.
Press the Done button when finished.
Thumbnail

Thumbnail
This tool brings up the thumbnail cropping page, just like the Thumbnail Page Setting, to let you set the doc's first page thumbnail which is displayed in the list of docs. See the Page Settings help page for more details about thumbnails and cropping.
When you have finished setting the thumbnail for a doc, you can either press the Done button or select another doc to set its thumbnail.
Name

Name
This brings up an edit field for editing the name of the selected Doc. You can also edit the name by tapping on the name displayed above the page preview.
Copy/Move to Folder
To Folder
This brings up a list of folders to which to copy or move docs you select. Use the Copy To/Move To setting to indicate which operation to perform:

Copy To

Move To
Use the "+" button to add a new folder, and the Edit List button to let you tap to rename them.
Press the Done button to confirm you have made all the needed selections.
Output Docs

Output
This tool lets you selected docs and email them all rendered as a single PDF file with one Note Taker HD page on each PDF page. The file attached will, by default, have a name that includes the current date and time to distinguish it from other rendered pages you email. Other output options are to send the PDF file to another app using "Open In" and, if printing is supported on your device, to queue the file for print.
The order page docs in the output will be that shown when you selected the docs, and you will be given an opportunity to confirm that a particular number of pages will be output by pressing a button. A progress bar will then show you how the rendering is progressing. When the rendering is completed a screen will display allowing you fill out the particulars of the email, including who it is sent to and subject, or an Open In menu, or a Print menu.
There are App Settings to control aspects of the PDF file and the outputting, including whether or not there are footers on the pages.
Before rendering of the pages starts, an Output window is displayed. The Output window has a Customize Settings button that gives you the option of making temporary changes to the output App Settings for a particular output. It also lets you specify whether the output target is email, "Open In..." another app, or, if printing is enabled on your device, queuing the output for printing.
All pages of multi-page docs are rendered with this command. To output selected pages of a doc use the Output Pages tool when viewing a list of pages.
Flag

Flag
This tool lets you set the optional colored flag that is displayed to the left of the thumbnail in the doc listing.
Favorites

Favorites
You can set any number of docs to be favorites by using this tool. You tap the doc that you wish to toggle the favorite setting.
Favorite Later

Later
This tool lets you set the selected doc to become a favorite at a specified time in the future. It is a way to say "remind me later."
More...
More...
This button lets you display additional tools.
Reorder Docs
Reorder
This lets change the "Doc Number" order of docs. It switches the listing to no filtering with the 1-per row thumbnail layout sorted by number, and displays reorder icons. You reorder docs by dragging the reorder icons on the right of each row. You can toggle the sort displayed between descending and ascending by using the sort order button at the top of the list. Tap the Done button when you are finished.
The doc order is used for display in the doc list. While it usually starts out as the order in which docs were created, you can change it to be whatever you wish. This is useful for things like the output as PDF functionality and when you want to treat all the docs as if they were in a notebook of some sort.
Save To

Save To
This tool lets you select docs to be saved as a single "pages.xxx.nthd" file for sharing or storage. Select the doc(s) you wish to save and then press the Done button. See the Backup and Restore help topic for more information.
Load

Load
This tool lets you select a "pages.xxx.nthd" file that was created with the Save To tool and load the doc(s) in it into the current folder as new docs. Select the file from which you wish to load and then press the Done button. You can also use the Edit List button above the list of files to delete them or rename them. See the Backup and Restore help topic for more information.
Backgrounds

Backgrounds
This brings up the Background Image List. Background Images let you add custom page backgrounds from images and PDF files. The Background Image List has its own help page.
Doc Settings
Doc Settings
This brings up the settings for the selected doc. See the Page and Doc Settings help topic for more information.
PAGE LISTING TOOLS
Delete Pages
Delete
Select the page(s) you wish to delete by tapping. Press the Done button to delete the pages. You will be asked to confirm the deletion before it is actually done. This operation cannot be undone.
Unstaple Pages
Unstaple
This tool lets you remove selected pages from the pages of a doc and make them normal, single page docs of their own. The names are derived from the doc name, and the new docs will include the same tags but not the favorite or flag settings.
Output Pages
Output
This tool lets you selected pages and email them all rendered as a single PDF file with one Note Taker HD page on each PDF page. The file attached will, by default, have a name that includes the current date and time to distinguish it from other rendered pages you email. Other output options are to send the PDF file to another app using "Open In" and, if printing is supported on your device, to queue the file for print.
Output Pages is similar to Output Docs, described above.
Thumbnail
Thumbnail
This tool brings up the thumbnail cropping page, just like the Thumbnail Page Setting, to let you set the page's thumbnail which is displayed in the list of pages. See the Page Settings help page for more details about thumbnails and cropping.
When you have finished setting the thumbnail for a page, you can either press the Done button or select another page to set its thumbnail.
Reorder
Reorder
This tool lets you reorder the pages within the doc. Drag the handles that appear on the right side of each page's row. When done, press Done to confirm or Cancel to undo the changes.
Rotate

Rotate
This tool lets you choose one or more annotation pages and then rotate the PDF background for each clockwise an amount you specify from the way it is currently displayed. Only pages with no annotation may be rotated.
Page Settings
Page Settings
This brings up the settings for the selected page. See the Page and Doc Settings help topic for more information.
FOLDER LISTING TOOLS
Backup All

Backup All
This tool lets you save the contents of all of the folders and all app settings as a single "archive.xxx.nthd" file for sharing or storage. When pressed, it first goes through all the files to see how much storage will be needed for the backup to make sure that it will fit on your iPad. You will then need to confirm that you want to create the backup. Each time you do a backup a new file is created.
It is good practice to create periodic backups and store them outside of your iPad. See the Backup and Restore help topic for more information.
Restore All

Restore All
This tool lets you select an "archive.xxx.nthd" file that was created with the Backup All tool and replace ALL of the current folders, docs, and settings with the contents of that backup. Select the file from which you wish to load and then press the Done button. It will then require confirmation that you indeed wish to delete all data and proceed. You can use the Edit List button above the list of files to delete or rename files. See the Backup and Restore help topic for more information.
Privacy

Privacy
This tool lets you set whether or not the selected folder (and its sub-folders) and the docs within have access controlled by a password. This lets you prevent sensitive documents from being inadvertently seen by someone else who may be holding your iPad.
The Privacy tool is only displayed when the App Setting for Password Protection is set to "Folders" or "App." It is only enabled when the Main Password is unlocked.
See the help section about Password and File Protection for more information about Password Protection and the Main Password.
You may choose among three options for the folder: Public (no password protection), App Password (access allowed if the Main Password is unlocked), and Local Password (access allowed if a password specific to this folder is unlocked).
Lock Main / Lock All / Unlock Main

Lock Main
Lock All
Unlock Main
This tool lets you lock and unlock the Main Password. If the Main Password is locked but any folder has its own password and is unlocked, then the tool will say "Lock All." The tool is only displayed when the App Setting for Password Protection is set to "Folders" or "App."
NOTE: The Lock Main / Lock All tool ERASES THE CURRENT PASTEBOARD CONTENTS as added protection.
See the help section about Password and File Protection for more information about Password Protection and the Main Password.
Normally, the Main Password is only locked when you switch to another app or turn off the iPad screen. The password is normally unlocked through an interaction when you switch back to the app or try to perform an operation that requires it to be unlocked. This tool lets you explicitly lock the Main Password (and all other passwords) immediately on demand. This is especially helpful when you have the passwords set to have a delay for locking.
After locking the Main Password, a prompt requesting the Main Password will appear. If Password Protection is set to "Folders" you can return to the app by tapping the Cancel button in the prompt without providing the password. This will leave the Main Password locked and certain operations (such as viewing and modifying certain App Settings, and using the Backup All and Restore All tools) inaccessible until it is unlocked.
Move Folder
Move Folder
This tool lets you move a folder and its contents (including sub-folders and docs) from its current location within a folder of folders or top level to another location.
First select the folder you wish to move by tapping on its name in the list of folders on the left and then tap the Move Folders tool. The list of top level folders will be shown on the right.
Navigate through the list on the right to find the target folder and then tap on its name (do not dive into its contents). If you wish to move the folder to the top level, select "To Top Level" instead of "To Sub-Folder" above the list on the right (this will hide the list). Press Done to confirm the move.
Note that you may not move a folder into a folder of docs, only a folder of folders.
APP SETTINGS
The App Settings page, accessed by pressing the App Settings button at the top of the Managing Window,
lets you view and modify many app settings.
The individual settings are as follows (in order from top to bottom):
New Doc Initial Settings
These settings let you specify the initial state of a newly created doc.
You can set the initial doc name, whether zoom editing's Auto-Advance is on or off, the type
of page background (wide lined, narrow grid, etc.), whether initial editing
is zoomed or unzoomed, the size of the Detail Area, and whether or not to have the wrist guard turned on.
There is a separate set of some of the settings for plain docs and for Annotation Docs. Annotation Docs are created either by using the "Annotate PDF File" item when you press the "+" when viewing the list of docs or when you send a PDF file to this app by using "Open In..." in another app. See the PDF Annotation Docs help topic for more information.
The new doc's name is set based on the Doc Name setting. If this setting is empty (no characters) the doc name will be empty but usually display as "Unnamed Doc." The setting may include plain text as well as Optional Fields. The fields let you include varying information, such as the current date and time. See the Optional Fields help topic for more information. By default, plain docs are given an empty name while new Annotation Docs are given the name of the PDF file they annotate (that is, the Annotation Doc Name value is "{filename}" which uses an Optional Field).
The Annotation Doc "Output as PDF" Setting is described in the help about PDF Annotation Docs. It is used to help avoid output crashes and font issues.
For more information about "Default Annotation Doc Line Spacing for Return", see the Page Editing help topic and read the sections about "Return" and "Line Spacing for Return".
If these settings do not give you enough control over new docs, you can use Template Docs (docs you placed in the Templates folder), or you can create a new doc by duplicating an existing page using the Duplicate Doc Tool.
Note that new pages for a doc (created by pressing the "+" (Add Page) button while editing) take their initial state from the last current page of the doc.
Default Output Settings
These settings are used as the initial values for the various options when
you email pages as a PDF file or image, or do other forms of output.
The Email Address setting lets you specify default values for the "To:" email field. You may have more than one email address separated by commas.
The Other Output Settings item brings up another window for setting many other default values. These values may usually be overridden at output time. See the Output Settings help topic (which is next).
Automatic Return
This setting controls the Auto-Advance behavior when you reach the right margin.
When the Auto-Return App Setting is "On" (the default), there is an
automatic alternative to pressing the Return button.
If you have recently written any ink in the right margin area (shown with
a brown-dot background) then writing in the Auto-Advance Area will first
advance the Detail Area vertically by the Line Spacing used by the Return button
and move it to the Left Margin.
(Unlike the Return button, there will be no additional vertical adjustments to align on line boundaries.)
When Auto-Return is turned on by this setting, the position of the Right Margin will be displayed on the Page View during editing as a dashed line in a manner similar to the Left Margin. By default, the Right Margin is set at 90% of the width of the page. By dragging on the triangle at the bottom of the dashed line, you can set a custom right margin for the page.
Button Color
This lets you change the color of buttons, selected items in many lists,
and a variety of other things on the screen that start out displayed in "sky" blue.
A sample of a button in the current color is shown on the settings row.
Tapping on this settings row opens up a Button Color page.
Rotate the sample color swatches with one finger to choose the color you would like.
Confirm by pressing the Done button at the bottom.
Note that when you select the white button color selected row backgrounds are shown in dark gray instead of the button color (white) which would be harder to differentiate.
Button Text
Normally the text on buttons is a dark gray.
Some people find that black text, while not a match for the icons,
is easier to see in the small font.
This setting lets you switch between the default gray and black.
In addition to the button text, it also affects the colors of text on some of the lists, such as doc names.
When used together with the white button color, this gives a high contrast to many of the UI elements.
Note that when used with the white button color, selected row backgrounds are shown
in black instead of gray for additional contrast.
Pen Presets
This lets you configure the four preset pen color/line thickness settings.
Choosing it opens up a Pen Presets page.
Tap on the Preset you want to configure and then set its color and line thickness.
The color chooser is similar to that used when editing for text and shapes.
Pen Memory
This app setting specifies whether the pen color and thickness
are remembered on a per-page basis (so when you go back to a page you
can write using the same pen as when you last edited it),
on a per-doc basis (so that as you go from page to page in a doc the pen
color and thickness are "sticky" and don't change as you switch, but
when you edit different docs they will each have their own "last pen used"),
or on an app-wide basis (where the pen is always as you last used it, even
when switching pages or docs).
Preset Zoom Detail Area Size Button
This setting lets you specify the size that the upper-right button sets the Detail Area.
The value refers to a magnification factor, with 1.0 being the small Detail Area
set by the left sizing button and 0.5 being the larger Detail Area
set by the default right sizing button (with less magnification of
the ink as displayed in the Detail Area and less shrinkage of what you write as displayed
in the Page View).
Zoom Editing Configurable Left/Right Buttons
The upper two buttons next to the zoomed editing Close-Up View are customizable.
They may be left as they are by default (which sets the Detail Area to a different sizes),
or replaced by a variety of other buttons: Zoom size buttons, a second erase button,
a button the move the Detail Area left, a Pen Attributes Chooser button, an Auto-Advance toggle,
Right-to-Left toggle,
and a second redo button.
For example, the second Erase button is helpful for those who erase frequently while writing.
The Move Left button is helpful to those who need to move around or write in both
left-to-right and
right-to-left languages.
Right-to-Left Auto-Advance Enabled
This setting lets you turn on the "Set Writing Direction to RTL/LTR" zoomed editing tool.
It also sets the Auto-Advance writing direction to Right-to-Left when set to "Yes" and Left-to-Right
when set to "No" (the default).
For more about right-to-left language support, see the "Support for right-to-left languages"
section at then end of the Page Editing help topic.
Right-to-Left Auto-Advance Trigger Width
This setting lets you control the position where writing in the Close-Up View triggers the Auto-Advance gray area.
The default is the same as in left-to-right.
A wide setting may be helpful for languages like Arabic where you might add marks to a word made up
of disconnected strokes.
For more about right-to-left language support, see the "Support for right-to-left languages"
section at the end of the Page Editing help topic.
Unzoomed Wrist Guard Separation From Writing
The "wrist guard" available when doing unzoomed editing is automatically kept a certain distance
away from your writing. This setting lets you adjust that distance.
See "The Wrist Guard" in the "Writing on the Screen" help page.
Writing Wrist Position
By default, this app assumes that you write with your wrist below your fingers.
Buttons are generally in the far right or upper part of the screen to avoid accidental
touches by your palm or wrist.
Also by default, the wrist guard also protects the area below your writing from touches.
This works well for many people.
For people who write with their wrists above their fingers, including many left-handed people, you can change that app assumption with this setting. If set to "Above writing," during editing a different layout will be used and the wrist guard will try to protect the area above your writing.
Retina Display Settings
The new, 3rd-generation iPad incorporates what Apple calls a "retina display" with
a 9.7-inch diagonal 2048x1536 screen.
Note Taker HD incorporates a variety of strategies to best make use of this display.
Some of these are for performance reasons (speed of page rendering) and some are
for adjusting to what looks best to you for your needs.
There are three settings that are only shown on iPads with this display: Ink Sharpness, Preview Quality, and Background Quality. They control the rendering of ink and other "content" you place on the page as well as any background PDF images.
See the "Retina Display" help section for more information.
Ink Smoothing
When you write on the screen a series of points are recorded.
The "ink" line displayed is based upon those points.
Normally, a smoothing algorithm is used that draws curves related to those points.
Smoothed lines often take a little longer to display, leading to more sluggish performance, especially with thicker lines, and may smooth out features that are important to your writing style. In that case, you can use the Ink Smoothing app setting to turn off smoothing. This affects both ink shown on the screen, rendered when thumbnails are created, and PDF and image output.
UNKNOWN:.
There are three smoothing settings: The default setting, "Smooth ink for display," uses curves and is the slowest. The "No smoothing" setting just connects the recorded points. It is the fastest. The "Simple smoothing" setting adds short line segments between the recorded points to make curves less angular. This setting had previously been the only smoothing provided by earlier versions of this app, but has been superseded by the new default. It is usually a bit faster than using real curves.
Note that during zooming and panning the line smoothing is automatically turned off for speed and you will see a line defined by just the raw recorded points.
VGA/Digital AV Adapter/AirPlay Echoing, Performance, and other settings
When editing or viewing a page, the Page View is echoed to an external screen through the
VGA or Digital AV/HDMI adapter, or through AirPlay, if one is connected.
See the VGA/Digital AV/AirPlay Echoing help page for more information.
There is an app setting to control the resolution or to turn off the special echoing.
There is another setting to select which of the optional pointers may be positioned on the screen,
and as well as a setting to control how the echoing extents are remembered.
There is another app setting to specify whether the echoing should be on a point-by-point basis as you move your finger to write ink, or only at the end of each stroke as you pick up your finger. The "echoing after each stroke" mode has a more continuous display on the tablet, while "echoing as you write" will be more continuous on the external screen, taking priority over showing ink immediately on the tablet.
Zoom Mode Close-Up View Echoing and Performance
There is an app setting to specify whether, in zoomed editing, the ink you
write in the Close-Up View is echoed on a point-by-point basis as
you move your finger to write ink, or only at the end of each stroke as you pick up your finger.
The "echoing after each stroke" mode results in smoother ink when you write quickly, especially when
also echoing to an external screen or on an older iPad.
In all cases, echoing to the Page View is lower priority than to the external screen and the
Close-Up View.
Auto-Advance Behavior
This setting toggles between the default Auto-Advance behavior of
advancing immediately when you start writing in the Auto-Advance Area and
an alternative behavior of advancing when you finish writing the first stroke.
In both cases the dotting "i" testing is performed.
The alternative behavior may be helpful when writing on a PDF background
that displays slowly, or with lots of thick ink that displays slowly,
causing the app to miss some of the movement that makes up the stroke
on older iPads.
Annotation Docs Background Display: PDF or Image
Normally, the background of an Annotation Doc is rendered directly from the PDF page at the
appropriate resolution. This gives the best resolution, but requires a re-rendering
whenever the view changes.
During panning and zooming, a medium-resolution "snapshot" is used for speed.
There are times, though, when you would rather that most rendering would be done
from the snapshot.
For example, repeated re-rendering can be quite slow with some PDF pages, and
some pages, especially with high-resolution graphics, can use up a large amount
of the limited runtime memory.
Running out of runtime memory causes crashes, and is more likely on older iPads,
Retina-display iPads at higher sharpness, or when connected
to external displays (even more so those running on HD displays at 1080p).
This setting lets you specify that Annotation Doc backgrounds be displayed from the snapshot ("IMAGE") instead of being repeatedly re-rendered at full resolution ("PDF", the default).
UNKNOWN:The setting affects all displaying (but not Output) of Annotation Docs.
UNKNOWN:It is an app setting and not a doc or page setting.
UNKNOWN:Background Images have their own View PDF/View Image setting.
Password Protection
There are a variety of forms of password protection available in the app.
This setting lets you set the "Main Password" that is part of that protection.
You can also specify whether access to individual folders requires a password or
whether you need to specify the Main Password to access the entire app.
You may specify an amount of time after you switch from the app, or turn off the screen, before the password is considered to be relocked. This can range from 0 seconds (immediately) through 60 minutes. You can explicitly lock all passwords immediately by using the "Lock Main / Lock All" tool when viewing folders in the Managing Window.
If the Main Password is locked, this setting will prompt you to provide it first.
See the help section about Password and File Protection for more information about Password Protection and the Main Password.
File Protection
This setting lets you instruct the app to use the iPad's Data Protection API when
writing files.
This, when used in conjunction with the iPad system Passcode Lock, gives
added protection for your data in the event that your iPad is stolen.
You should only use it if you understand its implications.
When you change this setting and then press the Done button, the app goes through all of the user data files and sets the File Protection to either "Complete" (On) or "None" (Off). (This can take from a few seconds to many minutes, depending upon how many files you have -- an indication of progress will be displayed as it operates. Do not turn off the iPad while file settings are being made.) The app also uses that setting for any future file writing operations.
If the Main Password is locked, this setting will prompt you to provide it first.
See the help section about Password and File Protection for more information.
Show First Use Help On Start
When first installed, this is set to "Yes" but it is turned to "No" when
you press the "Start" button on the initial help.
You may reset it to "Yes" for use by other users.
Shut down the app for it to take effect when you restart (i.e., stop it in the multitasking bar).
Statistics and Other Values
This shows the number of folders, including folders of folders.
Tapping this row will display a listing of the contents of the iPad file system directory containing the app's contents. It shows sub-directories but not the contents of doc directories (which you can list using a doc's settings' Statistics row). Creating this list may take several seconds if you have many docs. This is mainly for support and testing purposes.
If the Main Password is locked, this setting will prompt you to provide it first before showing the listing.
OUTPUT SETTINGS
The output settings specify many options available when producing PDF or image output.
The App Settings' Other Output Settings item lets you set the initial values used for
each setting when you request output.
Many of the output tools also give you the option of customizing the settings for
that particular output session.
Here are the output settings:
DEFAULT FOR EMAIL
These settings are used when emailing PDF files:
Email Subject
This is the value that will be given to the Subject field of an email before presenting it to you for sending.
The default value is "Written Notes as PDF" but you can change the value to
something else, including a value with Optional Fields. For example, "Notes: {firstpagename}"
will make the subject include the name of the doc being output (or just the first doc, if there are more than one).
The available Optional Fields are listed when you edit this value.
See the Optional Fields help topic for more information.
Email Message
This is the initial value that will be given to the main body of an email.
When editing the value, explicit line breaks (by pressing Return) are preserved.
The available Optional Fields are listed when you edit this value. They are similar to those for the Email Subject.
See the Optional Fields help topic for more information.
Filename for Output
This is the apparent name that will be given to PDF files being output.
It will be the name of an attached PDF file (without the ".pdf" extension).
It will be the name of a file that is "Opened In" another app.
Finally, it is also the name of the print "job" when printing.
The available Optional Fields are listed when you edit this value.
See the Optional Fields help topic for more information.
The default value is "Written-Pages-{now-filename}".
PDF OPTIONS
The next set of options only apply to PDF output (which includes printing):
Margin Around Page
This specifies the amount of extra space included around all output in a PDF file.
It defaults to 2/3", but may also be set to None to have no extra space, 1/3", or 1/2".
Whether or not you need extra space is determined by how you will use the result.
Many printer drivers provide their own extra space, or allow you to print the full
page size. Displaying a PDF file on screen usually provides no extra margin.
Include Footer in Output
By default, a footer is added to each page of the PDF file produced.
This footer can include the page number in the PDF file, the name of the Note Taker HD doc it
comes from, and more.
See the Footer Height, Left Footer, Center Footer, and Right Footer settings below.
This setting lets you suppress the footer.
Footer Height
This setting lets you specify how large the footer is.
The footer starts a bit below the ink page output, and continues down as far as necessary,
even into the bottom margin.
If you include a large amount of material in the footer (such as by using the {transcribed}
Optional Field) you may want a larger footer than normal, though this will make the ink page area smaller.
The values, Small, Normal, Large, and Very Large, correspond to 1/2", 2/3", 1", and 2" respectively.
Include Background (Lines and Images) in Output
This setting lets you suppress the background and only show ink and objects.
Include Outline Around Page in Output
By default, a thin gray line is drawn around the ink page part of the PDF page.
This setting lets you suppress it.
Minimum Line Width in Output
You can specify the minimum width of ink lines as drawn in the PDF to simulate
different pen thicknesses for the "finest" line setting.
This lets you write on the screen with very fine ink (which displays quicker than thicker ink)
yet have it a bit thicker in the final output, such as when filling in forms.
Target Paper Size
By default, the PDF output is formatted for 8 1/2" x 11" letter-size paper.
This option lets you specify that it be formatted for A4 paper instead.
The actual paper used in a printer is specified separately (not by this app), depending upon how you finally print.
Left / Center / Right Footer (with optional fields)
There are three parts to the footer: the left side, the center part, and the right side, much like
with the footer in a traditional word processing system.
You can specify the contents of each of these parts.
Like many word processors, you can include Optional Fields to automatically include varying information
in the footer.
Explicit line breaks (by pressing Return) are preserved in the footer settings, and long lines will be wrapped
when output to fit the corresponding part of the footer (3"-wide on the left and right, and 3/4"-wide for the center).
The available Optional Fields are listed when you edit this value.
See the Optional Fields help topic for more information.
The default value for the left is "{now}", for the center is "{pageno}/{pagecount}", and for the right is "{pagename+numbers}".
DEFAULTS FOR "EMAIL AS IMAGE"
These settings are used when emailing image and data files using the Email as Image Editing Tool.
Email Subject for Single JPEG Images, Email Message for Single JPEG Images
These are similar to the Subject and Message settings for PDF email.
They are the values that will be given to the Subject field and message body of an email before presenting it to you for sending.
Explicit line breaks (by pressing Return) are preserved in the Message setting.
The available Optional Fields are listed when you edit this value.
See the Optional Fields help topic for more information.
Send Image For Single JPEG, Send Raw Page Data For Single JPEG
These settings determine which data is attached
to emails sent with the Email as Image Editing Tool.
Normally an image of the ink is used (named "ink.jpg"), but you can also
attach the data file that stores the ink and other page information (named "notepage.txt").
The data file includes all of the ink points that you wrote and is in a
specially formatted text file.
OPTIONAL FIELDS
There are various settings in this app that let you specify Optional Fields within the setting value.
For example, the Center Footer setting, in a manner similar to many word processing systems,
defaults to "{pageno}/{pagecount}" which instructs the app to use the number of the current page being printed,
a "/", and then the total number of pages in the PDF file being output.
All of the Optional Fields are in the form of a "{" character, the name of the field, and then a "}" character. If the field name is not recognized, the name, as well as the "{" and "}" will be output like any other characters. Each setting has a specific set of fields that it recognizes.
When you are editing the setting, a list of the allowed fields is displayed below the text you type.
Here is a list of all of the Optional Fields:
TIME RIGHT NOW
{today}
This is the current date, expressed in the form "Monthname day, year" -- for example, "February 3, 2010".
{today-m/d/y}
This is the current date, expressed in the form "month/day/year" -- for example, "02/03/10".
{today-d/m/y}
This is the current date, expressed in the form "day/month/year" -- for example, "03/02/10".
{today-y-m-d}
This is the current date, expressed in the form "year-month-day" -- for example, "2010-03-02".
This is useful for values that may need to be sorted.
{now}
This is the current date and time, expressed in the form "year-month-day hours:minutes:seconds" -- for example, "2010-03-02 09:30:21".
This is useful for values that may need to be sorted.
{now-time}
This is the current time, expressed in the form "hours:minutes:seconds" -- for example, "09:30:21".
{now-filename}
This is the current date and time, expressed in the form "year-month-day-hours-minutes-seconds" -- for example, "2010-03-02-09-30-21".
This is useful for naming files uniquely that may need to be sorted and that you want to have few special characters (i.e., no spaces, slashes, or ":").
DOC AND PAGE ATTRIBUTES
Please Note: For compatibility purposes with data created on older versions of this app,
the word "page" is used in Optional Field names to refer to docs, too.
Note also that some of these may not be available when specifying email and other output information. For example, {pagename} is not available for Email Subject (there may be more than one doc output at a time) but {firstpagename} is available. The available Optional Fields are listed when you edit a value.
{pagename}
This is the name of the doc. All pages of a doc share the same "page name."
{pagename+numbers}
This is the doc name for the page plus the "doc number" shown in a list of docs, plus
which page it is within a multi-page doc.
{firstpagename}
This is the name of the first doc being output. In a multi-page PDF output, this lets
you use a name in the Subject or Message that works very well for single docs, and may be useful for multiple docs.
{foldername}
This is the name of the folder containing the doc(s) being output.
{foldername-filename}
This is the name of the folder containing the doc(s) being output, with "-" separating sub-folders instead of
">" characters to be acceptable in a filename.
{firstpagetags}
This a list of the tags for the first doc being output.
The tags are separated by commas.
{firstpagetags#}
This a list of the tags for the first doc being output.
Each tag is preceded by a "#" character.
{firstpagename+count}
This is the name of the first doc being output plus a count of how many more docs are in the output.
In PDF output, this lets you use a name in the Subject or Message that works well for any number of docs.
{tags}
This is a list of the tags for the doc, separated by commas.
The tags are the same for all pages in a doc.
{tags#}
This is a list of the tags for the doc, each one preceded by a "#" character.
The tags are the same for all pages in a doc.
{transcribed}
This is the contents of the Transcribe tab text area in the Transcribe tool for the page.
If there is more than a small amount of text there, you may want to set the Footer Height Output Setting to Large or Very Large.
{dtedited}
This is the date and time when the page being output was last "edited," in the form "year-month-day hours:minutes:seconds".
This is the same value used by the list of docs to sort docs by Last Modified.
{dtcreated}
This is the date and time when the page being output was created, in the form "year-month-day hours:minutes:seconds".
This value is shown in the "Other Values" setting on the page's Page Settings.
{annotationcomment}
This is the Background Comment field set when an Annotation Doc was created, optionally edited later in the Page Settings for the page.
{pdfpagenumber}
This is the page of the original PDF file that is displayed on a sheet in an Annotation Doc.
ANNOTATION DOC NAME
These may be used in the Annotation Doc Name App Setting.
{filename}
The file name of the file that is being annotated.
{filename-noextension}
The file name of the file that is being annotated with any extension (most likely ".pdf") removed.
This is helpful for situations where you will be sending the annotated PDF back to another app and
you use {firstpagename} as the Filename for Output (which will add ".pdf" when doing an "Open In" to
another app) and don't want ".pdf.pdf" in the resulting name.
Examples
You will find examples of the use of Optional Fields in some of the default settings, such as the footer settings.
Another example would be the following for the Initial Doc Name setting: "Created: {today-y-m-d} {now-time}".
This would create doc names like: "Created 2010-11-16 09:16:57" which automatically gives you a sortable name with extra information
about the doc.
An Email Subject of "{firstpagename} @Notes {firstpagetags#}" would create a subject line like:
"Trip Report 11/3/10 @Notes #ABC Corp #Trip Reports"
which could be useful with systems like Evernote.
PDF ANNOTATION DOCS
The Annotation Docs functionality lets you import a PDF file and automatically create a Note Taker HD doc with each of the
pages of the PDF file as the background of successive pages of the new doc. You can then read the contents of
that PDF file in this app, and write on those contents as needed.
You can import a PDF file either by using File Sharing in iTunes, or by using the iPad "Open In..." functionality in another app, such as the Apple iPad Mail app.
Importing PDF files: "Open In..." or iTunes
The first way to import PDF files into the app is to use the iPad "Open In..." facility on a PDF file in another app.
(For example, in the Mail app you press and hold and then release on the icon of a PDF file attachment, and
then select Note Taker HD from the list of apps to Open In.)
When you do this, Note Taker HD will be launched and you will be brought to the Create Annotation Doc window
(described below) with that file selected.
If, after doing "Open In...", you want to use the file for a background image instead of an Annotation Doc, use the option that will take you to the Background Image List. See the Background Image List help topic for more information.
The second way to import PDF files into the app is to use Apple iTunes as described in the File Sharing help page. You can just drag files on your personal computer into the Note Taker HD Documents in iTunes File Sharing and then select "Annotate PDF File" in this app's Managing Window's "+" Add New Doc list. The files you dragged into the documents folder will all automatically be copied into the File-Import Folder, which will then be displayed. Select the file you wish to use by tapping on it. You will be viewing the Create Annotation Doc window described below. (See the "File Sharing" Help topic for more information about the File-Import Folder. It is not a "folder" like those that hold docs or sub-folders. It is a file directory used in various parts of the app.)
The Create Annotation Doc window
The Create Annotation Doc window lets you optionally customize some settings for the doc being created, and
then initiate the actual creation of the doc.
One of the settings you can customize is the name that will be given to the doc. The initial value of this is determined by the Annotation Doc Name App Setting. By default, the name will be the filename, including extension, of the imported file.
Another setting is a comment that will be stored with each page of the new doc. The initial value of this is determined by the appropriate Annotation Doc Comment App Setting. The comment may be edited later for any page through the Page Settings. It may also be used in the footer when the page is output.
The initial pen color and thickness for all of the pages in the new doc may be set. For example, you may want to set the color to red with a medium thickness, or to a yellow highlighter.
You may specify an amount (clockwise) that all pages are rotated when displayed from the orientation indicated in the file for that page.
Finally, you can specify whether, when output, the PDF backgrounds of each doc are to be from the original PDF file (the default -- "Original PDF") or to be just an image of what was there ("Image"). This is explained below.
You start the creation of the Annotation Doc by pressing the "Create Doc" button at the bottom. After it is created, the new doc will be opened to edit. To view thumbnails of the pages, tap the "View" button.
The PDF file you are annotating is copied and associated with the Annotation Doc that is created. If you used a file from the File-Import Folder, the original file in the File-Import Folder will no longer be needed by that Annotation Page. You can delete it if you want (by swiping on its row in the File-Import Folder list either in the Create Annotation Doc window or the Background Images List).
The Page Layout setting for each of the sheets in an Annotation Doc are set based upon the layout of the PDF page. Portrait pages are narrow and tall, landscape pages are shorter and wider. Pages that indicate that they need rotation are rotated.
Output as PDF, Output as Image (to handle crashes and font issues)
You can specify whether, when output, the PDF backgrounds of each doc are
to be from the original PDF file (the default -- "Original PDF") or to be just an image of what was there
("Image").
You only need to change this to "Image" if you find that the text or other parts of the
page do not display correctly in the output or if the app crashes during output on a particular page.
On iOS versions before 4.2, font issues were common with many files with fonts other than Arial and Verdana.
In later versions of iOS the font problem may not occur as much if at all.
App crashing (returning to the iPad Home screen) may occur if creating the new PDF page out of the original PDF page
runs out of runtime memory or has other issues.
Images of pages are usually much larger in size (in terms of bytes) than using the PDF data itself
and are not as sharp.
Viewing and Editing Annotation Docs
In general, Annotation Docs are just like any other ink pages.
You can write on them, insert blank pages between sheets (with the Insert Sheet Page Tool),
and duplicate or delete sheets. These are some of the main differences:
The Page Settings of a sheet from an Annotation Doc has values for the Imported PDF File For Annotation settings. These are the page number of the original PDF file that is used as the background of that page in the doc, the Background Comment associated with the page (by default indicating where the background came from), any rotation you specified, and the Output Original PDF setting (explained above). All of these may be changed for each sheet in the Annotation Doc. (You change the rotation of pages you haven't written on by using the Rotate tool when viewing the list of pages for a doc in the Managing Window.)
You may staple Annotation Docs to other pages, and you may staple non-annotation docs to an Annotation Doc. Unstapling a sheet from an Annotation Doc creates another Annotation Doc with one page in it. That page will have its own copy of the original PDF file associated with it.
Displaying (and redisplaying during edit) a PDF background is often slower than displaying the normal lined backgrounds. During pinching and panning, a medium-resolution image of the PDF background is used for speed, but after you lift your fingers from the screen, the PDF background is rendered at full resolution, which will be much sharper than the image, but may take as long as a second or so to display, depending upon the complexity of the PDF (though it's usually much quicker than that).
Outputting Annotation Docs
Annotation Docs may have any or all of their pages output just like other docs: Emailed, Opened In, and Printed.
They have some additional Optional Fields ({annotationcomment} and {pdfpagenumber}) that may be used in the footer.
If you want the resulting output to fill as much of the output page as possible, you may want to set the
Include Footer in Output setting to "No" and the Margin Around Page setting to "None."
PDF output, especially Annotation Docs based on very large PDF files, can get quite large. Not all email systems handle large attachments well. Also, the iPad emailing software sometimes has problems with very large (many megabyte) files. If you run into such problems, you can try outputting in smaller numbers of pages, try using the Open In form of output to another app, or use File Sharing to manually copy off the "pages-to-pdf.pdf" file that holds the most recent output. See the File Sharing help topic for more information.
Sometimes you would like the output file to have the same name as the original PDF file being annotated. To do that, change that Annotation Doc Name App Setting from {filename} to {filename-noextension} so that the name will not have the ".pdf" at the end. Change the Filename for Output App Setting to {firstpagename}. When doing Output, the file extension ".pdf" is always added to the name determined by the Filename for Output setting.
The difference between Annotation Docs and Background Images
Annotation Pages are designed for having a single copy of a PDF file and annotating it with optional notes, and then perhaps
using tags and other means to organize it along with the other docs.
If you duplicate an Annotation Doc, a separate copy is made of the original PDF file to be associated with the additional page.
Background Images are designed to make it easy to use a single background on multiple pages of multiple docs with only one copy of the original PDF file or image. They are for forms and custom backgrounds, like for music or incident reports. If you change the definition of a Background Image, such as by changing the file it is associated with, all pages with that background will change.
BACKGROUND IMAGE LIST
The Background Image List lets you specify images or PDF pages to be used as backgrounds for docs.
IMPORTANT NOTE: This facility is mainly for use on multiple pages as a background, such as a form or stationery. While this may be used to "annotate" a multi-page PDF or an image, it is not optimized for that use and setting it up may be tedious. Use Annotation Docs to annotate multi-page PDF files -- see the PDF Annotation Docs help topic. Use Image Objects to add an image for annotation -- see the Images and Photos on the Page help topic.
(This help is available from the "?" button on the Background Image List screen.)
Create a new background by tapping the "-- Add New Item --" row in the list on the left of the screen. You give it a name by tapping within the text field on the upper-right. Press the "Edit List" button below the list to reorder or delete items in the list.
To set an image for a background, press the "Change" button below the image preview on the right. A listing of the contents of the Note Taker HD File-Import Folder will be shown. You can put files into this folder using one of two methods described below. (See the "File Sharing" Help topic for more information about the File-Import Folder. It is not a "folder" like those that hold docs or sub-folders. It is a file directory used in various parts of the app.)
The top row of the list says "Choose From Photos." Tap that row to bring up a list of Photo Albums on your iPad. Choose a photo to use it as a background.
Alternatively, if there are any files in the list, tap on a file's row to display it in the image preview. If the file is a PDF file, there will be a list you can use to select a particular page of that PDF file. In addition, PDF files give you the option of either letting the background color show through any transparent parts or using a white background. Press "Save" to assign that image to that background.
Once you have saved an image from the File-Import Folder, if you don't need it anymore you can delete the file from the File-Import Folder by swiping on its row.
For maximum quality (and often smaller size) the default option is to use the original PDF file as a background when rendering ink pages to PDF for output. There are cases, though, where the fonts in the original PDF do not export correctly, in which case you can specify that background output should not be as a PDF but rather as a bitmap image for that page image. This is a problem that shows up with versions of iOS before 4.2 and is hopefully fixed in later versions.
Normally if the background is a PDF, the original PDF page is rendered while viewing and editing, except while pinching and panning in which case a lower-resolution image of the PDF is shown. If you would rather use the image in more cases, switch View PDF to View Image. This is most helpful for complex PDF pages that are slow to display.
You can specify the alignment of the image: Fit to page width, fit to page height, fit the entire image even if it doesn't cover the entire page, and center a smaller version in the middle.
Importing Files
There are two ways to import files into the File-Import Folder:
The first way is to use Apple iTunes as described in the File Sharing help page. You can just drag files into the Note Taker HD Documents in iTunes File Sharing and then bring up the Background Image List to have them automatically copied in the File-Import Folder.
The second way is to use the iPad "Open In..." facility. When you do this, Note Taker HD will be launched and you will be given the opportunity to use "File Import" as the target of the Open In instead of "Annotate." Press the Done button to copy the file into the File-Import Folder and then bring up the Background Image List. The name given to the imported file will be shown. (Some files, such as JPEG files, will open directly into the Background Image List.)
For example, you can email a PDF file to yourself and then press and hold on the PDF icon shown in the Email app and then select Open In... Note Taker HD.
Image files are only rendered to 768 pixels wide when used as a background, so there is no need to have them any bigger. They will be shrunk or stretched as required. The page aspect ratio is 1:1.3, so only about 999 pixels high are used. For example, if you did a screen capture of 768x1024, only about 768x999 would be used if you specified Fit to Page Width for the background image.
The difference between Annotation Docs and Background Images
Annotation Docs are designed for having a single copy of a PDF file and annotating it with optional notes, and then perhaps
using tags and other means to organize it along with the other docs.
If you duplicate an Annotation Doc, a separate copy is made of the original PDF file to be associated with the additional doc.
Background Images are designed to make it easy to use a single background on multiple pages of multiple docs with only one copy of the original PDF file or image. They are for forms and custom backgrounds, like for music or incident reports. If you change the definition of a Background Image, such as by changing the file it is associated with, all pages with that background will change.
BACKUP AND RESTORE
Note Taker HD provides means for saving a snapshot of all of your docs and other data,
or a subset of that data, and then retrieving it at a later point.
This lets you "back up" everything in case of a failure or loss of your iPad, as
well as a way to share editable data with others.
The two forms of storing are Backup/Restore and Save/Load. Backup creates a single file with the contents of all of the data in all of the folders, as well as the list of tags and background images. Save creates a single file with the contents of just selected docs, along with extra information such as background image definitions needed for sharing and reloading.
Both forms of storing create files with the extension ".nthd". Both can either save the result in the Note Taker HD storage area of your iPad, email the file to others, or send it to another app with "Open In." The files created by Backup are initially named in the form "archive.ddd.nthd" (where "ddd" is derived from the date and time the file was created) and the files created by Save are initially named in the form "pages.ddd.nthd".
Older ".nthd" files are not deleted unless you explicitly delete them yourself. This allows you to keep snapshots of multiple states of your system, as well as multiple copies of individual docs or collections of docs. Deleting of backups can be done using the Restore tool, and deleting of saves can be done using the Load tool. You can also use those tools to rename the "ddd" part of file names to something you find more appropriate.
The ".nthd" files are stored in the top directory of the app's storage so they are easily accessed through iTunes File Sharing for off-loading to a personal computer and restoration from that computer. See the File Sharing help topic for more information.
Since Backup "archive.ddd.nthd" output can get quite large, emailing (as opposed to Open In or using iTunes File Sharing) is usually not a viable option for backups except for creating an initial, simple state, such as for initializing many users at once. Saved "pages.ddd.nthd" files are usually much smaller, depending upon whether they include large PDF files for annotation or background images.
NOTE: It is good practice to periodically create backups and store them outside of your iPad.
Backup All and Restore All tools
Backup All
Restore All
The Backup All and Restore All tools are available when you are viewing the list of folders in the Managing Window.
When you tap the Backup All tool, it first goes through all the files to see how much storage will be needed for the backup to make sure that it will fit on your iPad. You are then given the option of indicating the target of the backup:

File

Email File

Open In
These choices represent: As a file on your iPad in the main Note Taker HD data storage directory, as an email, or as a file to be sent to another app through "Open In." Some apps, such as Dropbox, accept files with the ".nthd" extension for storage even though they can't provide useful viewing of their contents. You will then need to confirm that you want to create the backup. Each time you do a backup a new file is created.
When doing a backup a progress indicator will show you what percent has been completed.
When you tap the Restore All tool, it first shows you a list of available files from which to restore. You can press the Edit List button above the list to delete unneeded files or rename the part between the "archive." and ".nthd" to something more meaningful.
Once you have selected the desired file, press the Done button to start the restoration. This first deletes all of your current data. During the restore process progress is indicated.
Save To and Load tools
Save To
Load
The Save To and Load tools are available when you are viewing the list of docs in the Managing Window.
When you tap the Save To tool, it lets you select docs to be saved as a single "pages.xxx.nthd" file for sharing or storage. Select the doc(s) you wish to save and then press the Done button. You are then given the option of indicating the target of the save:

File
Email File
Open In
These choices represent: A file on your iPad in the main Note Taker HD data storage directory, as an email, or as a file to be sent to another app through "Open In." Some apps, such as Dropbox, accept files with the ".nthd" extension for storage even though they can't provide useful viewing of their contents. You will then need to confirm that you want to create the save. Each time you do a save a new file is created.
When doing a save a progress indicator will be shown.
When you tap the Load tool, it first shows you a list of available files from which to load. You can press the Edit List button above the list to delete unneeded files or rename the part between the "pages." and ".nthd" to something more meaningful.
Once you have selected the desired file, press the Done button to start loading the saved docs into the current folder. During the loading process progress is indicated.
Open In
If you "Open In" a file with the ".nthd" extension to Note Taker HD,
the app will attempt to either use it for Restore or Load, depending
upon the type.
The type is determined by data in the file, not the name.
The "archive." and "pages." prefixes are used to determine
which files to list with the Restore All and Load tools,
but not for Open In.
If you Open In a ".nthd" file that was created with Save, you will be given the opportunity to specify the folder into which it should be loaded.
What is saved, and sharing with others
The "pages.ddd.nthd" files created with the Save To tool
include more than just the raw data of the docs selected.
They also include information about the tags and Background Images
used by those docs and the pages in them.
The Load tool checks to see that tags with the same names
as those for the loaded docs exist and creates them if necessary.
The tool also looks for existing Background Images with identical settings and
file contents, adding them if necessary.
This means that if you email a "pages.ddd.nthd" file to someone else and they load it, they should end up with something very similar to what you had when you saved.
FILE SHARING
Note Taker HD has "file sharing enabled" which means that its data storage is made accessible when your
iPad is connected to Apple iTunes. You will see "Note Taker HD Documents" listed on the Device "Apps" tab.
WARNING: Because you can modify that data, you should be careful not to make changes that could inadvertently affect the app.
This help page gives technical information that some people might find helpful. The current file layout on the iPad is very likely to change in possible future versions of the app. Some of this information is provided as interim help for technically knowledgeable users.
While all of the data files are made visible, Note Taker HD assumes that only it manipulates those files, except in a few very specific situations for file import. Feel free to copy files out of this shared list, but do not add or delete any without specific instructions or understanding of what you are doing. The app makes use of directories and iTunes (currently) does not seem to give the user access to write back into them -- only to copy from them. If you need to restore from such raw data, please contact Software Garden first. As explained below, it is not the preferred method of backup. It is just additional protection. Use the Backup functionality of the app as described next.
Backup and Save ".nthd" files
Files created with the Backup All and Save To tools, explained in the Backup and Restore help topic,
will appear at top level in the iTunes Documents listing.
You can copy them to your personal computer for storage and safekeeping.
As an exception to the warning above about putting files into the list shown in iTunes,
you can also drag previously copied such files back into the listing to get them back
onto your iPad.
It is good practice to make complete backups periodically and store copies off of your iPad. You may also want to keep copies of Saves of important recent docs. Instead of using iTunes, you can also email the files when created (if they are small enough) or use Open In to another app. You can restore or load from those using Open In from email or the other app, or transfer them to your personal computer and use iTunes File Sharing to put them in the iPad Documents directory.
The format of the ".nthd" files is such that they should be readable even on future versions of the app that change the internal file layout on the iPad.
The "pages-to-pdf.pdf" File
The most recently created PDF file for output will appear in the top directory listing as "pages-to-pdf.pdf" (the file
is renamed to something else in an email).
You can cancel out of emailing the file and then copy this file directly using iTunes if you wish.
This can let you access PDF files that are too large for convenient emailing.
It is also good practice to keep PDF copies of important docs in places other than your iPad
as further protection against data loss from iPad failure or any issues with backup and save files.
The File-Import Folder
The "File-Import Folder" is not a "folder" like those that hold docs or sub-folders.
It is not part of the Folders of Docs and Folders of Folders hierarchy.
It is a file directory used to access traditional computer files by various parts of the app.
It is stored with other app data and
mainly accessible when using certain functionality (like when creating an Annotation Doc).
It is called a "folder" for historic reasons in the app from before there
were other types of folders, and because Apple used the term "folder" instead of
"directory" in the documentation that related to it.
Here is where the File-Import Folder fits in:
The main other exception to writing files into the list is for importing images and PDF files for use as background images or annotation. When you bring up the Create Annotation Doc window or Background Image List, all files at top level with the extensions ".jpg", ".jpeg", ".png", and ".pdf" (not in the form "*.txt.jpg", "*.txt.base.pdf", or "pages-to-pdf.pdf") are moved to the File-Import Folder. From there they may be accessed when you want to create an Annotation Doc or when you press the "Change" button to set a background's image. This lets you easily copy single page or multi-page PDF files into the app. See the Background Image List help page for more information about background images and the PDF Annotation Docs help page for more information about Annotation Docs.
Note: Please don't import files with filenames that start with "Background-" and end with ".jpg", ".png", or ".pdf" using this method as they may be confused with existing background images as described next. You can use the "Open In..." method for those, though. Also don't use files with names that start with "Folder -".
File Location Validation
When the app first starts up (but not when it is resumed from switching to another app or sleep),
it checks to see if files with certain names are at the top level of the Documents directory instead of
various sub-directories where they belong.
This should never happen unless you purposely put those files there.
If the app finds files with the following names and some others like them in the directory, it will move them to their appropriate sub-directories and display a message from which you can then continue. Those filenames are: doc-xx-yy.txt, doc-xx-yy.txt.jpg, doc-xx-yy.zz.img.jpg, page-xx-yy.txt, page-xx-yy.txt.jpg, page-xx-yy.zz.img.jpg, Background-xx.jpg/png/pdf, and notetakerBackgroundsList.txt. You should not use those filename on files you are trying to put into the File-Import Folder.
This functionality is present to make it less tedious to restore raw data files that have been copied from the Documents directory for backup (but it is often tedious and time consuming). While storing and restoring data this way often works, it is not the preferred way and you should not attempt restoring data this way without first contacting Software Garden for app support. The preferred way to do backup is the normal iTunes sync used for most apps, with additional protection using the Backup All and Save To tools, and by keeping copies of PDF output (such as using the "pages-to-pdf.pdf" file as described above). Saving the raw data is a fourth-level, "belt-and-suspenders" form of backup.
VGA / DIGITAL AV / AIRPLAY ECHOING
If you have either the Apple "iPad Dock Connector to VGA Adapter" or the "Digital AV (HDMI) Adapter",
or an Apple AirPlay-compatible device such as Apple TV,
you can show some or all of the Page View
while viewing or editing on an external screen, such as a projector or flat-panel TV.
This is called "echoing".
The external screen is blanked when the List of Pages or Help is being displayed.
When an external display is connected, a dashed red rectangle labeled "External Video" will be displayed on the Page View. Whatever is shown on the Page View within that rectangle will be echoed to the external display. The outline of the Detail Area and the margin lines are not echoed to the external display.
The External Video rectangle has two handles: One, a diamond in the center-bottom, may be used to drag the rectangle to show different parts of the view. The other, a triangle in the bottom-right corner, may be used to resize the rectangle to show more or less of the view. The part of the view displayed does not change as you zoom or pan the Page View, nor when you move the Detail Area in Zoomed editing, so you are free to do normal editing without confusing the others watching the external display. The display is also independent of the orientation of the iPad. The position of the rectangle is saved along with other edits, so when you return to a page it should be where you last left it. There is an App Setting, External Video Memory, that specifies whether the position and size are set independently on a per page basis, or stay the same as you move from page to page within the doc.
To display the entire Page View on the external display, you can use the VGA Fit Width and VGA Fit Height Editing Tools.
When doing Zoomed editing, echoing can work in either of two modes. In one mode ink is echoed to the screen only after you take your finger off of the screen to end each stroke. This is similar to how ink is echoed to the Page View by default when doing Zoomed editing. This results in best performance and smoothest ink. In the other mode ink is echoed point by point as you move your finger on the screen. This is the most pleasing for viewers, but can result in less smooth ink if you write too fast and a less continuous feel on the iPad since the external screen is given display priority. You can choose which mode to use by going to the Page List Tools and selecting App Settings. Use the VGA Adapter Echoing and Performance setting.
Resolution and "mirror" settings
The "External Video Settings" app setting can be used to control the output.
By selecting "OFF" you can turn off the special echoing done by this app.
On an appropriate device (for example, the iPad 2 or the 3rd-generation iPad) this will switch to normal full-screen mirroring,
showing the entire device screen including the buttons, the Managing Window, the left margin, etc.
On other devices it just turns off the echoing.
Alternatively, you can select the desired resolution to be sent as output using echoing. This choice may be needed depending upon the setup of your external display. Some displays are able to display more than one resolution. You can choose "1024x768", the normal XGA resolution of VGA output, "720p", the 1280x720 HD resolution, "1080p", the 1920x1080 HD resolution, or "Maximum", which looks for the largest height for the widest width. Higher resolution uses up more memory for the screen buffer and may run slower than less resolution. The default is "Maximum". The actual resolution being used is shown next to the "External Video" label on the dashed red rectangle.
External Video Pointer
You can use the Show VGA Pointer Editing Tool to display a pointer on the external screen:
Tools
Show VGA Pointer
Hide VGA Pointer
The pointer is also shown in the Page View. It is not shown on either screen if you are mirroring instead of echoing and the external video rectangle is not displayed. Note that the size of the pointer is always the same on the external screen. It is scaled proportionally on the Page View and can get quite small.
You can position the pointer by dragging it in the Page View. The position starts out near the upper-left corner of the screen. The "hot" area for dragging the pointer extends below the image to make it easier to position exactly when not looking at the external screen.
There are a few different styles of the pointer:


You can switch between those styles with the External Video Pointer Style App Setting.
PASSWORD AND FILE PROTECTION
There are many situations in which you need to keep the contents of your docs
from being accessed by other people.
Some of these situations need approaches that are different from those
needed by other situations.
Note Taker HD provides a mix of protection mechanisms from which you can
choose for providing the protection you need.
For many people, no special protection is needed. Their notes, for example from lectures or meetings, have no special security needs. In that case, the default use of the app will suffice. The app is started and stopped like any other app, and access is available at all times to all content and functionality.
For other cases, for example business notes about sensitive topics or personal diaries, you want to be able to control access through a mechanism such as a password. For these situations, Note Taker HD has what are called "Password Protection" and "File Protection." Having many options for protection is usually confusing at first, but once you understand the options you'll see when each is needed and which will best suit your needs.
Password Protection vs. File Protection
Password Protection is the term used to describe protection provided by Note Taker HD itself.
It refers to functionality for "locking" access to the app itself or to the contents
of selected folders.
Password Protection has no effect on other apps.
It also is not highly secure in that a technically knowledgeable person in possession of
your iPad for sufficient time can circumvent it to obtain access.
This protection is mainly intended as a deterrent to someone who has borrowed your iPad for a few minutes
or who has access while you are elsewhere in the room, or who has no malicious intent.
File Protection, also known as Data Protection, is the term used by Apple to describe protection provided by the iOS operating system. This is used in conjunction with the iPad-wide "Passcode Locking" that is used to lock the entire iPad. File Protection keeps sensitive data on the iPad from being accessed by unauthorized users, even if they have long-term possession of the device and are technically knowledgable about its workings. Note Taker HD can be set to include all of your data that it controls in that category of "sensitive data" that is protected. This type of protection is the type that certain corporations require in order to consider the iPad "secure enough" for their use because of policy or for regulatory reasons.
Password Protection and the "Main Password"
Password Protection is controlled by the Password Protection App Setting.
This setting has a "Use" value that may either Off, Folders, or App:

Off
Folders
App
If the Use setting is "Off" then no Password Protection is used. If it is set to "Folders" then one or more folders may be configured to require a password for access. In addition, certain functionality, such as doing a complete backup or accessing certain App Settings (which includes the Password Protection setting) will also require a password. If Use is set to "App" then a password is required to access the app itself.
Normally one password is required to unlock the app and all of the password protected folders. This is the "Main Password" and it is set as part of the Password Protection App Setting.
Once you have provided this Main Password in a session, its "unlocked" state is remembered and you will not need to provide it again until it is locked through various means. This locking occurs when you switch to another app, turn off the iPad screen (or have it Auto-Lock after the time specified in the iPad General Settings), or explicitly lock it with the "Lock Main / Lock All" tool in the Managing Window.
NOTE: The Lock Main / Lock All tool ERASES THE CURRENT PASTEBOARD CONTENTS as added protection.
You can set a Delay using the Password Protection App Setting that is used for all Note Taker HD passwords. If you set the delay to more than 0 seconds, the app will allow up to that amount of time to pass with the app off without locking any locked passwords.
When Note Taker HD needs a password to be unlocked to access a folder or perform an operation, it will prompt you to enter the password. In some cases you will need to retry the operation after you have unlocked the password. Also, in some cases you can press Cancel and choose not to unlock the password. The prompt will help you know what is required.
Note that the prompt for a password is not always shown immediately when you return to the app if you left while viewing certain screens such as Help or the App/Doc/Page settings. It will be requested before you can get back to the Managing Window or editing a page.
Password protecting folders
If Password Protection is set for the "Folders" use,
then access to folders is controlled by the Privacy setting for each folder.
You can change the Privacy setting by selecting a folder in the Managing Window
by tapping on its name, and then using the Privacy tool:
Privacy
The Privacy tool is only available when Password Protection is not Off and the Main Password has been unlocked. (You can unlock the Main Password with the Unlock Main tool next to the Privacy tool.)
The Privacy tool gives you a choice of three privacy settings: Public, App Password, and Local Password:
Public
App Password
Local Password
If the setting for a folder is "Public", then it does not require a password for access. This is the default case for new folders. If the setting is "App Password", then the Main Password controls access to the folder. Providing that password for any folder or function that unlocks the Main Password will provide access to this folder. If the setting is "Local Password", then you may set a password specific to this folder.
For most people, using the App Password setting (meaning control by the Main Password) is the simplest and most common use of Password Protection. However, there are cases, such as when a single iPad is shared among multiple students, when you might want a separate password for different folders.
If you set a folder to require a password, then all sub-folders of that folder will also require that password for access.
Lists of folders indicate whether or not a folder is locked with an icon.
File Protection
File Protection is a complex concept that may not apply to most users.
However, because of the importance of security to many users
and their need to make use of this functionality, this documentation
tries to provide the information you might need if you use it.
NOTE: If you use File Protection with this app make sure that you successfully do your own data backup (such as with the Backup All tool) and successfully and appropriately store that backup data off of your iPad.
DO NOT USE FILE PROTECTION UNLESS YOU UNDERSTAND THE IMPLICATIONS OF USING IT.
The iOS operating system has a variety of capabilities for protecting data stored on your iPad. This is often referred to as Data Protection or File Protection. The more secure protection is provided when you have a Passcode Lock set. This is controlled by the iPad main Settings, in the General Section. If a Passcode is required for access to the iPad, then much of the sensitive system data is protected in a more secure manner. User data, though, is only protected in this more secure manner if an app explicitly sets its data to use the "Data Protection API" available in iOS 4 and later. Note Taker HD has an option for taking advantage of this capability. By default it is turned off.
You can find out more information about Data Protection and File Protection in iOS in documentation from Apple and others. Having a Passcode set has various implications, including possible data loss if you forget the passcode and interactions with other functionality such as iCloud and iTunes File Sharing. You may want to be aware of these implications before enabling it. Corporate IT departments may have policies about its use, such as requiring it for certain data.
You can instruct Note Taker HD to use the Data Protection API with the File Protection App Setting. This setting gives you two options, Off and On:
Off
On
If File Protection is On, and Passcode locking is in effect on the iPad, the app will use the Data Protection API when it writes files. Technically, it sets the NSFileProtectionKey to NSFileProtectionComplete instead of NSFileProtectionNone when it creates or modifies files.
If File Protection is Off, and Passcode locking is in effect, the app will use the Data Protection API when it writes files. Technically, it sets the NSFileProtectionKey to NSFileProtectionNone when it creates or modifies files.
When you change this setting and then press the Done button, the app goes through all of the user data files and sets the File Protection to either "Complete" (On) or "None" (Off). (This can take from a few seconds to many minutes, depending upon how many files you have -- an indication of progress will be displayed as it operates. DO NOT STOP IT while it is running.) The app also uses that setting for any future file writing operations.
If you use the Restore All tool to restore all the data from an "archive.xxxx.nthd" file and the restored data changes the File Protection setting you will get a warning. At that point you might want to terminate and restart the app, and then toggle the File Protecting setting back and forth (pressing Done each time) to make sure that all files are set as you currently wish.
Technical note for those most concerned about security:
When you bring other files into Note Taker HD, such as through Open In or iTunes File Sharing, the app usually moves those files, such as into the File-Import Folder directory used by the Background Images and Annotate PDF File functionality or into the storage for a particular new doc. These moved files will get the appropriate File Protection settings. It also tries to remove any previously unmoved files from the transfer directory but not those in the main Documents directory added through iTunes File Sharing. The originals that aren't moved may be left on the iPad in an unprotected form. You can always make sure that all files in the app's main Documents directory are set correctly by switching the protection back and forth between On and Off as appropriate.
You can check the File Protection key setting for files by using the Statistics row of the App and Doc Settings. Tapping that row displays a listing of files in the app (down to the doc level) or the doc, respectively. If Passcode Locking is enabled, an indication of each file's key setting (FP:On, FP:Off) will be shown.
RETINA DISPLAY
[Note: Do NOT press the Update button below! Its use is explained at the end of this page.]
The new, 3rd-generation iPad incorporates what Apple calls a "retina display" with a 9.7-inch diagonal 2048x1536-pixel screen. Note Taker HD incorporates a variety of strategies to best make use of this display. Some of these are for performance reasons (speed of page rendering) and some are for adjusting to what looks best to you for your needs.
There are three main areas affected by the retina display's high-resolution: Displaying content (ink, text, etc., plus PDF pages as a background), previewing a page in the Managing Window, and thumbnails. PDF Output is the same on retina displays as it is on lower-resolution displays. Icons (such as those on buttons and in lists of commands) are rendered at a higher resolution on retina displays.
The default settings should be fine for most people. However, to maximize performance or to see more ink at once on the display, you may want to understand the options and experiment with your content. The details are provided here.
Displaying content
Content is displayed at one of three quality settings:
Low, medium, or high.
By default, on a retina display ink content is rendered at a "medium" sharpness setting, with the minimum ink line thickness being approximately 1/2 point (about 0.15-0.2mm). This is similar to the thickness on a lower-resolution screen, but is much sharper. (The retina display uses about 2 small pixels to represent a line at this setting, while the lower-resolution display uses 1-2 larger pixels.) The effect continues to be of a very fine pen, but with more visible detail than on the lower-resolution display.
At "medium" resolution, text and other non-ink content is also rendered at somewhat less than the full capacity of the retina display, but noticeably sharper than on lower-resolution screens.
You may use the Retina Display Ink Sharpness app setting to change content rendering to "high" (which has a minimum ink line thickness of about 1/4 point -- 0.1mm -- and makes full use of the retina display for text, shapes, and images), or to "low" (similar to a non-retina, low-resolution display).
PDF rendering is, by default, done at the full resolution of the display ("high"), with a low-resolution image used when panning and zooming if needed for speed in the same manner as non-retina displays.
You may use the Retina Display Background Quality app setting to change PDF rendering to be similar to a non-retina display ("low").
The higher settings usually have a speed penalty, but for many users that speed difference should not be too noticeable, if at all, except with some complex PDF images or a large amount of ink.
The medium setting for ink sharpness was chosen as the default because many users find the high setting produces minimum ink lines that are too thin for comfortable reading. Others find the high setting preferable because it lets them see more of the page at once and they find the very tiny writing acceptable. This is a matter of personal preference. The setting may be changed at any time and does not affect the ink stored in the page.
Note Taker HD usually displays pages with small text using the minimum thickness ink since that renders much faster than even slightly thicker ink due to technical issues that iOS must deal with. That is also why it switches to all thin ink when panning and zooming for best performance.
In all cases, PDF output uses its own minimum ink thickness setting. This is controlled by the "Minimum Line Width in Output" output setting. You can have the high setting for Ink Sharpness and still use a "Thick" setting for the PDF output.
Preview
The preview page display, shown in the Managing Window, can be rendered using
two methods. On non-retina displays they produce almost identical output.
On retina displays with a medium and especially with a high Ink Sharpness setting, one method,
called high quality, produces much closer output to the editing display.
The lower quality preview method is slightly faster.
The default is high quality.
Thumbnails
The thumbnail images produced for all pages are always rendered at a high quality and
sharpness.
This means that thin ink is usually very thin.
This makes it a little easier to recognize the content of a thumbnail than
if it was rendered at a medium or low quality.
The higher quality thumbnails will even look a little sharper in most cases on non-retina displays than thumbnails from earlier versions of the app. If you upgrade later to an iPad with a retina display, you will see the full resolution.
Upgrading thumbnails from earlier versions
Users of earlier versions of this app upgrading to a version that
supports a retina display will find that existing thumbnails
will still have the low-resolution quality.
Any newly created or edited pages will have their thumbnails rendered
at the higher resolution.
If you decide that you'd like to re-render all of the thumbnails with the new higher resolution, you can have Note Taker HD automatically go through all of the pages one-by-one and recreate them. This can take many minutes depending upon how many pages you have and how complex they are to render. (For example, some PDF annotation pages can each take up to a second or more, as you see when you switch from page to page.)
Press the "Update" button below to go through all pages and re-render the thumbnails. A count is first made of all of the pages to be rendered. You then press a "Start" button or cancel. As the thumbnails are rendered, progress will be displayed. Do not turn off your iPad or switch to another app while it works.
WHAT'S NEW IN VERSION 6.8
This is the thirteenth release of Note Taker HD on the iPad (the twelfth was version 6.7).
It has many new features, including Auto-Return, smoother ink, ink resizing and rotation,
support for right-to-left languages, and a moveable VGA pointer.
There are also many bug fixes and other changes.
Auto-Return, Right Margin, and Line Spacing
Auto-Advance now includes Auto-Return.
If you have recently written any ink in the right margin area
(shown with a brown-dot background),
writing in the Auto-Advance area will advance the Detail Area vertically
and move it to the Left Margin.
(Writing done exactly at the left side of the darker gray area will end up being lined
up at the Left Margin.)
Auto-Return may be disabled with an App Setting. It is turned "On" by default.
To go along with this, there is a new Right Margin line that you can position by dragging. It sets the start of the right margin area. In addition, there is a new Line Spacing for Return setting to let you customize the amount that Return and Auto-Return move vertically, as well as the top offset for the Return button's "line boundary" alignment.
See the Return, Auto-Return, and Line Spacing for Return sections of the "Page Editing" help topic for more information.
Smoother Ink
There has been a major change to the code for displaying pages.
This will, hopefully, result in smoother ink for most users, and
better performance during Auto-Advance and Auto-Return.
In addition, the "Smooth ink for display" setting (the default) now fits curves to the ink points rather than just adding additional straight lines to approximate a curve. (The old, "simple smoothing", is still available as an option.)
The new code makes better use of the multiple CPUs in the later iPads, and should result in fewer "lost pen movements" on all iPads. It does, though, mean that the synchronization of ink, background, and various screen displays may lag a bit during editing. For example, when echoing to an external display (VGA, AirPlay, etc.) with the "Echo as you write" setting, the external display will have priority and the inking on the iPad may lag a bit.
Ink Resizing and Rotation in Select Mode
There is a new tool in Select Mode: Resize/Rotate Ink.
This tool brings up handles that let you resize the selected ink horizontally, vertically, or equally in both directions.
There is another handle (in the upper-left) to reposition the ink.
Finally, there is also a special, circular rotation area that you can drag on to rotate the selected ink.
Once you touch down on the circle, if you drag on or inside of the circle, ink will be rotated
in 15 degree increments. If you continue dragging outside of the circle, rotation will be continuous.
Press the Confirm button that will appear at the top of the screen to finalize the sizing and rotation changes
(or the Cancel button to undo all of the changes).
Support for Right-to-Left Languages
Zoomed editing has been optimized for use with languages that are written from left to right, like English.
To help those who write in a language that goes from right to left, such as Arabic or Hebrew, there is now
an option to switch the operation to be optimized for right-to-left writing.
To use this new feature, first enable it by changing the new "Right-to-Left Auto-Advance Enabled" App Setting to "Yes". This will switch to right-to-left (RTL) operation, and enable the new "Set Writing Direction" Zoom Tool that lets you toggle between RTL and LTR while editing.
See the "Support for right-to-left languages" section at the end of the Page Editing help section for more information including details about exactly how the app behavior changes.
VGA Pointer and VGA Memory
There have been two major additions to the support for external displays (accessed through
the VGA adapter, the HDMI adapter, and Apple AirPlay).
The first is that there is now an editing tool to turn on a "VGA Pointer" that displays over both the main
Page View on the iPad and on the external screen.
You can position the pointer by dragging on it in the Page View.
The "hot" area for dragging the pointer extends below the image to make it easier to position exactly when
not looking at the external screen.
There is an "External Video Pointer Style" App Setting to change the appearance of the pointer.
The other addition is the new "External Video Memory" App Setting. The position and extents of the External Video rectangle is saved along with other edits to a page. When you go from page to page, those values are restored to the way they were when you last edited the page (or the initial default position for new pages). The new setting lets you specify that instead of this "per page" memory behavior, you can switch to "per-doc" memory, in which case the position and size will stay the same as you go from page to page within a doc. For example, if you change the rectangle to show an entire portrait page while displaying page one, when you switch to page two, the entire second page will be displayed no matter how it was last displayed.
Other Changes
Some of the other changes to the app include:
The app now has a "launch image" that is displayed as a placeholder when the app is run. This, as recommended by Apple, has the basic elements of the app screens, without the varying parts. It shows a status bar with "Loading..." and the gray backgrounds of the main layouts.
The handles of the Selection Rectangle in editing Select Mode have been made easier to drag with larger touch-sensitive regions.
The smoother ink capture is complemented by increasing the maximum number of captured points on a page to about 150,000 from 100,000.
Displayed text is now performed by different code (needed for the smoother ink and potential future additions to the app). This may change the way text is word-wrapped to fit in the text box when existing pages are viewed in the new version. The most obvious example is that dashes in numbers are treated differently. This should not affect most people.
There is a new "Annotated Docs Background Display: PDF or Image" App Setting. This may be helpful when you have Annotation Docs with PDF pages that render very slowly, or use up lots of runtime memory and are prone to crash during edit, especially when connected to external displays (even more so on those running on HD displays at 1080p). See the App Settings help for more information.
Bug Fixes
Some of the bugs fixed include:
The "unstaple last page" bug has been fixed. Confirming paste in Select Mode now redisplays on the external display. A bug with undone overwritten strokes was fixed.
The case where you do a 3 or more fingered swipe (such as with the iPad multitasking gestures) and then subsequent writing in the Close-Up View temporarily appears offset from your touch should now operate correctly.
---------------------------------------------------------------------------------------
WHAT'S NEW IN VERSION 6.7
This is the twelfth release of Note Taker HD on the iPad (the eleventh was version 6.6).
It has support for the new 3rd-generation iPad as well as a few new features and bug fixes
that help users on all iPads.
PDF Annotation Enhancements: Rotation and List Annotated Pages Only
There are two major additions to the handling of PDF files for annotation: Manual page rotation
and the ability to list only annotated pages (hiding ones that have not been written on).
Both of these can be accessed when viewing the list of pages for a doc in the
Managing Window.
(You bring up the list of pages by tapping ">" next to the doc name
or by pressing, holding, and releasing on the doc thumbnail when viewing the list of docs).
Use the Rotate tool to rotate pages you select by 90, 180, or 270 degrees clockwise. Only pages on which you haven't put content (ink, shapes, or images) may have their rotation changed. You can also specify rotation for the entire document when you first create an annotation doc.
When the list of an annotation doc's pages are shown in the Managing Window (either on the left or as part of the full-screen preview) an "Ink/All" button will be shown below the list that lets you toggle between showing all pages and just those pages with ink and other annotation.
This "annotated only" feature lets you quickly find just those pages in a long PDF on which you have written -- for example, to output only those pages. You can also use it to mark pages in a long document as "bookmarks" with even a tiny amount of ink to make navigation easier instead of scrolling through the whole list.
Documents created with older versions of the app may not have the information stored to facilitate this "annotated only" feature. When you press the button, you will be given the opportunity to automatically scan the document to obtain the needed information.
Image Cropping
There is a new setting when editing an image that has been inserted
on a page: Crop Image.
This brings up a screen showing the entire original image and allows
you to adjust cropping.
The original image is saved at full resolution even though the inserted
cropped image may be restricted in resolution as explained in
the "Images and Photos on the Page" help page.
This means that you can use a photo (such as taken with the 5-megapixel
3rd-generation iPad camera), show a cropped sub-image,
and then copy that and re-crop to show another sub-image at it's
original resolution.
Higher Resolution Thumbnails
Page thumbnails are now stored at a higher resolution.
These provide more information when viewed on the new iPad's display, but
also should often be a bit sharper on older displays.
The "Retina Display" help topic has more information, including
how to upgrade all existing docs to have the new thumbnails.
Retina Display Support
This new version of Note Taker HD incorporates a variety of strategies to best make use of the
2048x1536-pixel screen on the new 3rd-generation iPad.
They may be adjusted with three new App Settings.
Some of these are for performance reasons (speed of page rendering) and some are
for adjusting to what looks best to you for your needs.
The initial, default settings produce a look that is distinctly sharper than previous iPads. Ink and other user-added content, though, can be made even sharper by adjusting the Ink Sharpness setting. Some people find that makes the thin ink too thin and too different from previous versions, so the "medium" level is used as the initial setting. PDF content, by default, is shown at full sharpness on retina displays.
See the "Retina Display" help topic for more information.
Bug fixes and minor improvements
As usual, there are bug fixes and minor improvements:
Bug fixes include fixes to the problem with the Pen Memory setting not being remembered across restarts of the app.
Ink rendering has been sped up in some cases, especially with lots of ink on a page. This results in high quality rendering on the new iPad not being much slower than previous iPads with older versions of the app despite the added processing used for the high quality. It also makes those older iPads display faster than they did before.
There are new App Settings: Auto-Advance Behavior to adjust when auto-advance is performed, and three Retina Display settings if you have an iPad with a retina display to adjust quality and performance. See the "App Settings" help page for more information.
---------------------------------------------------------------------------------------
WHAT'S NEW IN VERSION 6.6
This is the eleventh release of Note Taker HD on the iPad (the tenth was version 6.5).
It has a few new features and bug fixes.
Sub-Folders
You can now have a hierarchy of folders inside of other folders.
This feature gives you additional organizational capabilities.
To create a folder that can have sub-folders, press the "+" button to create a new folder and choose "Folder of Folders" instead of "Folder of Docs" from the new dropdown. Next press the ">" to the right of the name of the new folder to view its contents. Add other folders within it to hold docs or sub-sub-folders. Use the "Up" button to move back up to the parent of a folder.
Note: Folders of Docs can only contain docs, and Folders of Folders can only contain folders.
The folders in a Folder of Folders may be any mixture of Folders of Folders and Folders of Docs. You can move folders and their contents with the new Move Folder tool.
Here is an example of how you might use both Folders of Folders and Folders of Docs: Create two top level Folders of Folders named "Semester 1" and "Semester 2." Press the ">" next to Semester 1 to view its empty contents. Use "+" to create Folders of Docs with names like "Math", "Chemistry", and "History." In Math you could put docs like "Lecture 4 Notes" and "First Report Ideas."
See the Folders help topic for more information.
Pen Memory
There is a new app setting for specifying whether the pen color and thickness
are remembered on a per-page basis like previous versions of the app
(so when you go back to a page you can write in the same pen as when you last edited it),
on a per-doc basis (so that as you go from page to page in a doc the pen
color and thickness are "sticky" and don't change as you switch, but
when you edit different docs they will each have their own "last pen used"),
or on an app-wide basis (where the pen is always as you last used it, even
when switching pages or docs).
This setting defaults to "per-doc" for new purchasers of the app, but starts with the previous default of "per-page" for users upgrading from a version before 6.6.
Password Protection
Folders can now be password protected, as can the app itself.
Before using this feature, see the Password and File Protection help topic
for a description of the varieties of protection available.
File Protection
Note Taker HD now has optional support for the iOS Data Protection API.
This is something that is important to users with certain security requirements.
See the Password and File Protection help topic for details.
Downloadable Templates and Clip Art on Support Site
The support web site, www.notetakerhd.com, now has an Extras section
with template docs and clip art images that you might find helpful.
See the web site for more information.
Bug fixes and minor improvements
As usual, there are bug fixes and minor improvements:
Bug fixes include fixes to the problem with some pasted shapes getting distorted and to initial crashes after upgrading to a new version. Filenames of output data now have non-filename-safe characters replaced by "-" characters.
Images in the PNG and GIF file formats now treat transparent parts of an image as transparent unlike previous versions. The font size setting for text blocks now goes down to 4pt instead of just 6pt. These additions will make the downloadable template docs and clip art images more useful.
The Optional Fields {foldername} and {foldername-filename} have been added to those allowed for various Output settings.
---------------------------------------------------------------------------------------
WHAT'S NEW IN VERSION 6.5
This is the tenth release of Note Taker HD on the iPad (the ninth was version 6.0.1).
It has a few new features and several bug fixes, including better compatibility with iOS 5 (which it does not require).
Copy / Cut / Paste
The Select Mode now includes tools for Copy, Cut, and Paste.
With Copy and Cut the selected ink, text areas, shapes, and/or images are copied
to the iPad pasteboard in a special Note Taker HD format.
That data may then be pasted onto the same page, another page in the same doc,
or another page in another doc.
The Paste command is only available when appropriate data is on the pasteboard.
Pasted material is placed in the same position on the page as it was when copied or cut. You can drag that material around on the page to position it and then press the Paste button that will appear at the top of the screen to finalize.
Customizable Button Colors
The color scheme has been changed a bit, replacing the light and dark blue items with shades of gray.
The button and selected item color (initially "sky-blue" as before) may now be changed
to any of 16 variations using the Button Color App Setting.
To make the buttons and other items higher in contrast, there are App Settings allowing you to have a white button background color and black text.
Reordering Pages
You can now reorder the pages in a doc in the Managing Window, not just when editing the doc.
UI Tweaks
Here is some of what's new: The position and sizes of some of the buttons have changed.
You can press and hold for 3/4 second on the pen color/thickness button in the top toolbar when editing to bring up the
screen for setting the Pen Presets.
The current state of Auto-Advance (on or off) is now displayed
in the upper-right corner of the Close-Up View.
Font choices in Text, Shape, and Image modes are now displayed in the named font.
iOS 5 Compatibility
A cosmetic issue with some popover menus that only showed up in iOS 5 has been fixed.
Editing with "Wrist Above" set (used by many left-handed users) now hides the
app status bar (with the iPad time and power indications) to make it less
likely that the iOS 5 Notification Center will be brought down by a
wrist motion that is interpreted as a swipe-down by the system.
The four- and five-finger "multitasking gestures" introduced in iOS 5 can sometimes interfere with the Note Taker HD wrist guards when the system interprets your palm as some extra fingers. You will see the screen wiggle or even start switching to another app. The multitasking gesture functionality may be turned off in the iPad Settings' "General" section.
Additional Discount Code
Another pen manufacturer has made a discount code for Note Taker HD users.
See the Help page about Special Offers.
Bug fixes and minor improvements
As usual, there are many bug fixes and minor improvements:
Bug fixes include fixes to the problem with the Pen Preset settings page losing recent edits, duplicated pages in stapled documents sometimes getting the wrong PDF for a background, the Preset Zoom Detail Area Size Button setting being ignored, the Select All and Deselect All buttons being ignored in the list of pages, a crash when certain files were encountered when handling files manually inserted using iTunes file sharing, "Open In" of a complete backup (as opposed to "Open In" from doc saves, or restoring directly from a file) not working, various backup/restore issues such as not supporting folder names with commas and not reloading settings or empty folders, blank docs showing up sometimes after moving a doc to another folder, and custom background images being shown instead of the PDF file in annotation docs.
The margin around the PDF output may now also be set to 1/3" and 1/2" in addition to the previous 2/3" and 0". The Optional Field {filename-noextension} has been added to those allowed in the Annotation Doc Name App Setting.
---------------------------------------------------------------------------------------
WHAT'S NEW IN VERSION 6.0.1 (and 6.0)
This is the ninth release of Note Taker HD on the iPad (the eighth was 6.0, the seventh was version 5.1).
Version 6.0.1 is the same as 6.0 with the addition of fixes for bugs with the search filter, name-only doc listing, and page text typing.
Version 6.0 is a major upgrade, with a totally new look and lots of new features.
New terminology: Docs and Zoom
Note the change in terminology throughout the app:
The old "pages" are now called "docs" and the old "sheets" are now called "pages."
Hopefully this will be less confusing.
The old term "Edit 2" is called "zoom on" or "zoomed editing" and the old term "Edit 1" is now called "zoom off" or "unzoomed editing." You switch editing modes with these icons:
New UI look and New Managing Window
To facilitate the new features, the UI has been changed.
This is especially true of the old "List of Pages" which is now the "Managing Window."
Buttons look different and some tools that were on buttons are now on popovers,
and some that were on popovers are now on buttons.
Take time to look carefully for new and moved features,
watch the videos, or read the Help.
Folders
Docs are now stored in folders.
You can create additional folders,
and move or copy docs from folder to folder.
Each doc is only in one folder at a time.
Templates are stored in the Templates folder. Move or copy a doc into that folder to make the doc a template.
Preset Pens
There are now four user-settable pen color/thickness choices.
Filtering
The list of docs is displayed in the Managing Window.
You can now filter that list by favorites, one or more tags at once,
text in the doc name, and flags.
You can now also sort by the date/time a doc was created.
Backup/Restore and Save/Load
You can now write out all of your data
(the contents of all folders and the settings) to a single Backup file
to be off-loaded to a personal computer or sent to another app through Open In.
You can also write out one or more docs as a single Save file that can be loaded at a later point. This saved file may be emailed to others to be read into their copy of the app. Saved files may also be off-loaded or sent to another app with Open In.
Zoom Tools and Configurable Buttons
In zoomed editing there is now a Zoom Tools button above the Return button.
It brings up a popover with a list of tools.
(Auto-Advance On/Off has moved to that list.)
You can also configure both of the small buttons in that cluster
to be any of a variety of tools, including a pen chooser.
Zoomed editing wrist guard
You can set the Close-Up View to stay short when you move it up the screen
so you get an empty wrist guard area below.
Swiping in Preview
In the Managing Window you can switch from page to page in a doc
by swiping up or down on the preview image, and from doc to doc by swiping left or right.
Full Screen Preview
You can preview docs and their pages from the Managing Window in full screen.
Fewer stapling and reordering restrictions
You can now staple Annotation Docs to each other or to normal docs.
The first page of a doc is no longer special and can be reordered.
(The thumbnail of the current first page of a doc is the one shown in the list of docs.)
Bug fixes and minor improvements
As usual, there are many bug fixes and minor improvements.
---------------------------------------------------------------------------------------
WHAT'S NEW IN VERSION 5.1
This is the seventh release of Note Taker HD on the iPad (the sixth was version 5.0/5.0.5).
In addition to the major features added in version 5.0 (listed below)
it has a few new features and some bug fixes.
Move to Front and Move to Back
There are two new buttons available when editing text, shape, or image objects, and when using Selection.
These buttons let you move the selected objects and/or ink strokes to be "in front of" or "behind"
everything else.
They are useful, for example, to move a color-filled box behind existing ink.
New Flow Chart and Other Shapes
Over 20 new shapes have been added, including many commonly used for
flow chart diagrams, as well two for guitar music notation.
The X/Y Axis 1 and 4 Quadrants, the XL Arrow, the Pie Chart Maker, and other shapes have had
minor updates.
Support for iPad 2 and the Digital AV (HDMI) Adapter
There is a new "External Video" app setting to enable the new screen mirroring capabilities of the iPad 2
(turning off the normal "echoing" that lets you crop what is shown),
as well as 1024x768, 720p, 1080p, and "Maximum" resolution settings to give you more
control over output to external displays.
See the "VGA/Digital AV Echoing" help topic for more information.
Minor Changes and Bug Fixes
There were a variety of minor changes and bug fixes, including
better handling of images with EXIF rotation settings (including those produced by
the iPad 2 camera), and
support for inserting ".gif" and ".bmp" images.
---------------------------------------------------------------------------------------
WHAT'S NEW IN VERSION 5.0 (and 5.0.5)
This is the sixth release of Note Taker HD on the iPad (the fifth was version 4.5).
It has some major new features and some bug fixes.
New Buttons When Editing a Page
There are five new buttons available when editing a page.
These buttons switch between the original ink editing mode (the first button) and the four new editing modes:
Text, Shape, Image, and Select.
Blocks of Text
You can now type blocks of text onto a page using the keyboard.
These blocks may have optional borders and fill colors.
See the Text on the Page help topic for more information.
Shapes
You can now insert geometric shapes onto the page by dragging them
from a gallery of over 40 pre-defined types.
These include simple shapes like lines and circles as well as
much more complex ones like a day-planner template.
Most shapes may be customized to set the size, color, orientation, and many other attributes.
See the Shapes on the Page help topic for more information.
Images
You can now insert images and photos onto the page.
Sources include the iPad Photo Albums, the iPad Pasteboard, and imported images.
Images may optionally have their orientation changed, as well as be
given borders and typed captions.
See the Images and Photos on the Page help topic for more information.
Selecting, Moving, and Modifying Ink and Objects
You can now select ink and objects and then move them on the page or delete them.
You can also change the color or line thickness of existing ink strokes.
See the Selecting Ink and Other Objects help topic for more information.
Lots of Bug Fixes
There were a variety of minor changes and bug fixes, including
better handling of PDF pages with a rotation of 270 degrees produced by some scanning software,
more advanced detecting of certain files loaded through iTunes,
and some "Erase All" bugs.
Version 5.0.5
Version 5.0.5 fixes at least four bugs present in 5.0: The ink should now flow smoother, like
version 4.5.
Various issues with the interaction of timestamp shapes and thumbnails, including crashes, should be fixed.
A bug with typed text color and thin colored lines is fixed.
You can now select ink that goes to the very right or bottom edge of the page, even when it
must be contained in the selection rectangle.
It also fixes an old issue with duplicated sheets (not the first) keeping the original create date/time.
---------------------------------------------------------------------------------------
WHAT'S NEW IN VERSION 4.5 (after version 4.1)
This is the fifth release of Note Taker HD on the iPad (the fourth was version 4.1).
It has some major new features and some bug fixes.
Annotation Pages
New functionality has been added to make it easier to import and annotate multi-page PDF files.
(The existing Background Image functionality was designed for forms and other reusable single-sheet backgrounds,
and was not designed for annotation purposes.)
The Annotation Pages functionality lets you import a PDF file and automatically create a Note Taker HD page with each of the pages of the PDF file as the background of successive sheets of the new page. You can then read the contents of that PDF file in this app, write on those contents as needed, and organize it along with other pages.
You can import a PDF file either by using File Sharing in iTunes, or by using the iPad "Open In..." functionality in another app, such as the Apple iPad Mail app.
See the PDF Annotation Pages help topic for more information.
True Landscape and Other Layouts
Landscape paper layout is now supported, as are other layouts used in imported PDF files.
You can specify Portrait (8 1/2" x 11" or A4 -- narrow and tall), Landscape (11" x 8 1/2" or A4 -- wide and short),
or VGA (4:3 aspect ratio to correspond to a VGA computer screen) using the Layout sheet setting.
PDF output is rotated appropriately to best fit paper.
Optional Fields in the Page Footer and Elsewhere
The page footer in PDF output may now be more precisely specified.
As in many word processors, you can type text to appear on the left, right, and in the center.
That text may include Optional Fields to automatically insert various values, including:
{pageno}, {pagecount}, {pagename}, {now}, {now-m/d/y}, {tags}, {transcribed}, and many more.
There are also settings for the initial name of a new page that may be controlled in a similar manner.
See the Optional Fields, the App Settings, and the Output Settings help topics for more information.
More Control Over Output, Including Open In and Print
There are additional output settings, such as Filename for Output, Footer Height, and Target Paper Size.
Before output is produced, you are now given the opportunity to temporarily change the output settings,
including the footer specifications, whether or not there is a margin around the output, and more.
See the Output Settings help topic for more details.
You are also now given the choice of directing the output either to email as in previous versions, or to "Open In..." another app, or, if your iPad supports it, to be printed directly using the print functionality added in iOS 4.2.
New Editing Tools: Insert Sheet, VGA Fit Width, VGA Fit Height
Three new Editing Tools have been added: Insert Sheet inserts a blank sheet after the current sheet, including
in Annotation Pages.
VGA Fit Width and VGA Fit Height are available when an external screen is connected to quickly resize the
area displayed.
Edit Page Name by Tapping in the Navbar
When editing or viewing a page, you can directly edit the page name by tapping on the name displayed in the navigation bar
at the top of the screen.
iOS 4.2 Support and Improved PDF Output
This version of the app has been tuned to work better with iOS version 4.2 and multitasking.
It also supports the iOS 4.2 printing functionality.
The iOS 4.2 upgrade will hopefully bring other improvements, including more opportunities for "Open In" and a less frequent need to use the "Output to PDF: NO" setting in this app for background images or annotated PDF pages.
Lots of Bug Fixes
There were a variety of minor changes and bug fixes, including:
Saving the tag list more frequently to keep it up to date,
enhancing the pen color and thickness button to show both the color and thickness,
fixing a bug that sometimes caused a crash after deleting a sheet,
saving the name of a background image is some cases when it wasn't and should have been,
saving the position of the list of pages table in more cases after editing,
and fixing an obscure Erase All/Undo/Color bug that sometimes created a page that would crash when opened.
---------------------------------------------------------------------------------------
WHAT WAS NEW IN VERSION 4.1 (after version 4)
This is the fourth release of Note Taker HD on the iPad (the third was version 4.0).
It has a few new features and some bug fixes.
Ink Smoothing
Ink, even on existing pages, is now smoothed for display (and emailing).
Lines should have much smoother curves instead of angled straight line segments, and slowly
written ink will be much less jagged.
There is an App Setting to turn this off for slightly faster displaying
or to revert to the old look.
Button Options
The upper two buttons next to the Edit 2 Close-Up View are now customizable.
The first button may be left as it is (which sets the Detail Area to a small size),
or replaced by either a second Erase button or a "Move Left" button.
The second Erase button is helpful for those who erase frequently while writing.
The Move Left button is helpful to those who need to move around or write in
right-to-left languages. (See "Support for right-to-left languages" in the Page Editing help topic.)
The second button now has an App Setting named "Preset Detail Area Size" to specify the size it makes the Detail Area.
Bug Fixes
There are a variety of bug fixes, including: Hiding the Change button in the Background Image List if
there are no items (this used to sometimes exit the app); echoing to the VGA at the end of each stroke correctly;
adding "Done" and "Cancel" buttons when Transcribing to a New Contact;
saving editing performed with an external keyboard in Transcribe that were not being saved in 4.0;
not losing the first stroke in Edit 1 after a Zoom in View;
making the sizing and position handles for the External Video work in View better when you are also using Edit 1;
changes to the "advance" behavior in Edit 2 when near the right edge of the sheet allowing the Detail Area to be
partially off-screen for better performance;
better restore of the Detail Area position on the right side of the screen on reload.
---------------------------------------------------------------------------------------
WHAT WAS NEW IN VERSION 4 (after version 3)
The third release of Note Taker HD on the iPad was version 4.0 and it had many additions and changes,
many of them in response to feedback from heavy users of the app.
Here is a list of some of what was new:
New Look and Layout
The entire look of the app has changed.
There is a new icon, new button styles, new button placements, and more.
New Page Rendering Code
New program code has been put into the app to make it possible to display a wider range of
effects on the page. This has resulted in the addition of the next two items on this list.
Pen Line Thicknesses
Instead of being restricted to just a thin line, you can now specify one of five line thicknesses.
There are also four new semi-transparent "highlighter" colors.
Custom Background Images
You can now add your own images or PDF pages to the list of backgrounds that can be assigned to a page or sheet.
See the Background Image List help for more information.
Background Colors
The default light green page background has been changed to a light yellow.
(Old thumbnails will be updated when you bring the page up for editing.)
There is now a Page Setting to set the background color, including the old light green, white, and a darker yellow, if you want.
Template Pages
In addition to the standard default blank page, customizable with a few app settings,
you can now add any page to the list of Template Pages.
When creating a new page you can choose any of those pages to be duplicated from a simple drop down list.
All of the template page's settings, tags, ink, backgrounds, etc., are copied into the new page.
Wrist Guard and Writing Wrist Position Setting
There is now an optional "wrist guard" in Edit 1 to help prevent inadvertent touches.
There is also an app setting to better support those who write with their wrists above their fingers.
Minimum Line Width in PDF Output
There is now an app setting to let you have the thinnest PDF ink be "medium" or "thick" rather than the default "fine."
Local Help
Instead of the "tooltips" displayed when you pressed buttons in previous versions, many screens include
a "?" button that brings up help specific to that screen.
Minor Changes and Bug Fixes
There are numerous other changes and bug fixes.
---------------------------------------------------------------------------------------
WHAT WAS NEW IN VERSION 3 (after the original version 2.1)
The first release of Note Taker HD, based in part on Note Taker for the iPhone/iPod touch version 2.0,
was version 2.1.
The second release of Note Taker HD is version 3 and it had many additions and changes,
many of them in response to feedback from heavy users of the app.
Here is a list of some of what was new:
Pen Colors
Instead of being restricted to just black ink, you can now select from 16 colors.
Multi-Sheet Pages
Pages can now have more than one sheet of "paper" to make them into mini-notebooks.
There is an "Add" button available while editing to add a blank sheet while writing with just a
couple of taps.
For many uses this is much better than version 2.1 where you needed to go back to the
List of Pages, create a new page, and then group pages with tags.
There are also tools for "stapling" pages together into one multi-sheet page, making it easier to upgrade to this functionality from the previous version.
See the Multi-Sheet Pages help topic for more information.
VGA Echoing
If you have the Apple "iPad Dock Connector to VGA Adapter" you can show some or all of the Page View
while viewing or editing on an external screen, such as a projector.
This can be very useful for business meeting and classroom use, especially
in conjunction with colored pens and emailing PDF files.
See the VGA Echoing help topic for more information.
Editing Tools Button
When editing there is now a Tools button next to the Erase button.
The Tools button brings up a variety of useful page-oriented tools,
including ones to work with its sheets, email or save a JPEG image instead of the
normal PDF (useful in some cases for receivers that work better with images),
and rename the page.
One of the tools is called "Transcribe" and it brings up both a view of the ink as well as some text areas for manually transcribing what you wrote with a keyboard. That text may be automatically saved as contact information or used for pasting into other apps.
PDF Output Options
The PDF output can now include the page background lines.
There are new app settings to control whether on not the lines
are included, as well as turning on or off the outline around each page
and the footer with page number, name, and date.
Smoother Ink
Ink is no longer echoed in Edit 2 point-by-point in the Page View. Instead it is
echoed each time you take your finger off of the screen at the end of each stroke.
This results in a higher sampling rate and smoother looking ink.
(If you want the old behavior, with echoing immediately as you move your finger,
change the Edit 2 Close-Up View Echoing and Performance app setting.)
Minor Changes and Bug Fixes
There are numerous other changes, such as having double-tap in the View window while editing
switch back to editing.
There are bug fixes, such as making auto-advance work better with overlapping strokes
when the Detail Area is other than the small size and making the saving of page order more reliable.
Some redundant tools have been added, such as the Thumbnail Page Tool for setting a page's thumbnail
on the List of Pages without needing to bring up the Page Settings.
DIFFERENCES FROM IPHONE/IPOD TOUCH NOTE TAKER 2.0
Note Taker HD is a different product than Note Taker on the iPhone and iPod touch.
It shares some of the same code and UI, but is different in a variety of ways.
At this point there is no easy way to share data between the two.
The most obvious difference is that editing is done with two views instead of overlapped on one. The Auto-Advance is made more explicit with buttons and tool settings, but works in a similar manner. In addition, most views of ink may be resized using the pinch gesture.
Note Taker HD does not have a built-in tutorial. Instead it starts out with drawing directly on the page as the default and Auto-Advance off. Buttons, in general, include text names.
Note Taker HD is missing Typed Pages that use the keyboard for input. It does, though, add multi-page docs, colored pens, and much, much more.
The two products can coexist on the same device. The pages are separate.
NOTE TAKER HD YOUTUBE VIDEOS
You will find videos about Note Taker HD on the support web site (www.notetakerhd.com)
along with other information of interest, such as a list
of some known current bugs, frequently asked questions, and more.
In addition, you can access the videos showing Note Taker HD features by
going to the YouTube channel NoteTakerHD (www.youtube.com/NoteTakerHD).
Pressing the button below will exit Note Taker HD and bring up the browser on the home page of that YouTube channel if you are connected to the Internet.
(Note: You may need to expand the "My Videos" section of the YouTube channel to see the list of current videos. Also, YouTube should be in the "Touch Screen" mode, the automatic default on the iPad, not "Desktop", as shown on the bottom of the page.)
OTHER INFORMATION
This app was designed and written by Dan Bricklin (www.bricklin.com).
He is best known as the co-creator of VisiCalc, the pioneering electronic spreadsheet
program.
He is also the author of the book Bricklin On Technology, published by Wiley Publishing, Inc.,
which helped inspire Note Taker 2.0 on the iPhone/iPod touch and this app.
The app graphic design, layout, and the button icons were created by Adina Bricklin (design.adinabricklin.com).
Most of the shapes and the app icon were designed and created by Mike Rzepka (www.mikerzepka.com).
Help during development was provided by many individuals, including Adina Bricklin, Carol Singer, Alex Kieft, and Mike Rzepka. Some earlier icons were created by Sarah Knox.
Many people helped beta test the various versions of Note Taker HD, including Bill Chapman, Conrad Barski, JeongMin Han, Ron McCamish, Anand Mandapati, Jordan Thevenow-Harrison, Scott Loftesness, Pedro Jorge Romero, Jim Boyle, Bindu Wavell, Sheldon Laube, Robert Bazinet, Katie Day, Chris Curan, Richard Gardner, Benoit Cazenave, Michael Circe, David Wicks, Srivatsa Krishna, Donovan Watts, David Jacobs, Jim Ayson, Yosi Taguri, Hezi Cohen, John Sviokla, Linden deCarmo, Gerald Lewis, Jared Herweg, Mike Saig, Mike Beatty, Mike Simmons, Dan VanDusen, Ben Schmidt, Alex Kim, Shawn Weaver, Don LaVange, Greg Jones, Brian Naplachowski, Paul Lindgren, Rob Rosen, Terry Hatmaker, Edward Gaughan, Steve Kopischke, Roger Pena, Wayne Hartman, Stephanie Hawthorne, Dave Cicotte, Eduardo Salinas, Rick Pott, Deborah Bensted, and Wan Nadzim. They provided valuable help, influenced the features, and helped find bugs to fix. Thank you to all of the beta testers!
If you like Note Taker HD, please let others know!
Ratings and reviews on the App Store affect the popularity of the product.
Support and other information is provided on the Note Taker HD web site, www.notetakerhd.com, in addition to the YouTube videos. Press the button below to switch to the support site in a browser.
Another app from Software Garden: Garden Utils for Programmers
Garden® Utils for Programmers is a simple app for the iPhone/iPod touch and iPad that provides a variety
of utility functions that can be useful for programmers and web content developers.
It helps you deal with RGB/RGBA color values, examine images at the pixel-level, do hex file dumps,
access simple documentation, and more.
It is used in the development of this app.
For more information, go to www.gardenutils.com.
SPECIAL OFFERS ON A "PEN"
Many people prefer using a stylus with note taking programs like Note Taker HD instead of their fingers.
The iPad screen uses a technology that only works with a special type of stylus.
This is usually not the sharp-pointed type that you might find on desktop tablets, Tablet PCs,
or many older pocket organizers, but rather one that has a wider end that simulates the electrical characteristics of a finger.
Even though the tip is wide, the iPad software only tells programs like Note Taker HD about
a single point of contact for the tip so it acts like a pointed pen and small finger motions
result in small variations in the "ink" position.
Different people prefer different brands of stylus. Some designs have more "drag" against the screen and perhaps work better for those who print with short strokes. Other designs have less drag and may be more comfortable for those who use cursive handwriting. Some have thick barrels and some have thin. Some have a "real" ink pen on the opposite end of the barrel for writing on paper. Which is best for you is a matter of personal preference.
Two manufacturers have made discount offers to users of this app and they are included here. (The offers are to you, the user -- the company that wrote this app does not receive anything from your purchase. They are also NOT an endorsement of those products -- we have not done any extensive testing or comparisons of pens.)
* Pogo Sketch *
Ten One Design is offering users of this app a 20% discount when
you buy a stylus from their web site.
Among other products, they have the Pogo Sketch, a small "pen" that you can use to "write" on the screen.
The web site is: www.tenonedesign.com
The coupon code is: pogonotetaker
* Aponyo *
Kosella sells a few different styli in the "Aponyo" line.
These pens are available from Amazon.com.
Kosella offers users of this app a 10% discount on your purchase.
Their web site is: kosella.com
The promotional code to use on Amazon.com is: notetake
PHYSICAL WRIST GUARD
We have received a sample of a Stylus Handpad from www.ANicelyDone.com.
This is a small suede pad that slips over your little finger.
It lets you rest your hand on the pad, and the pad on the screen, without generating
touch indications to your iPad.
It comes with a normal iPad-compatible stylus, but you can use most any stylus with it.
From a quick evaluation it seems to work for at least some of us.
I know almost nothing about the company that sells it.
For people who like to leave the Multi-Tasking Gestures enabled, or who hold their wrist to the left or right of their fingers when writing, a product like this may be an acceptable solution.